Quinn Pullover Knitting Pattern
Introducing: the Quinn Pullover Knitting Pattern

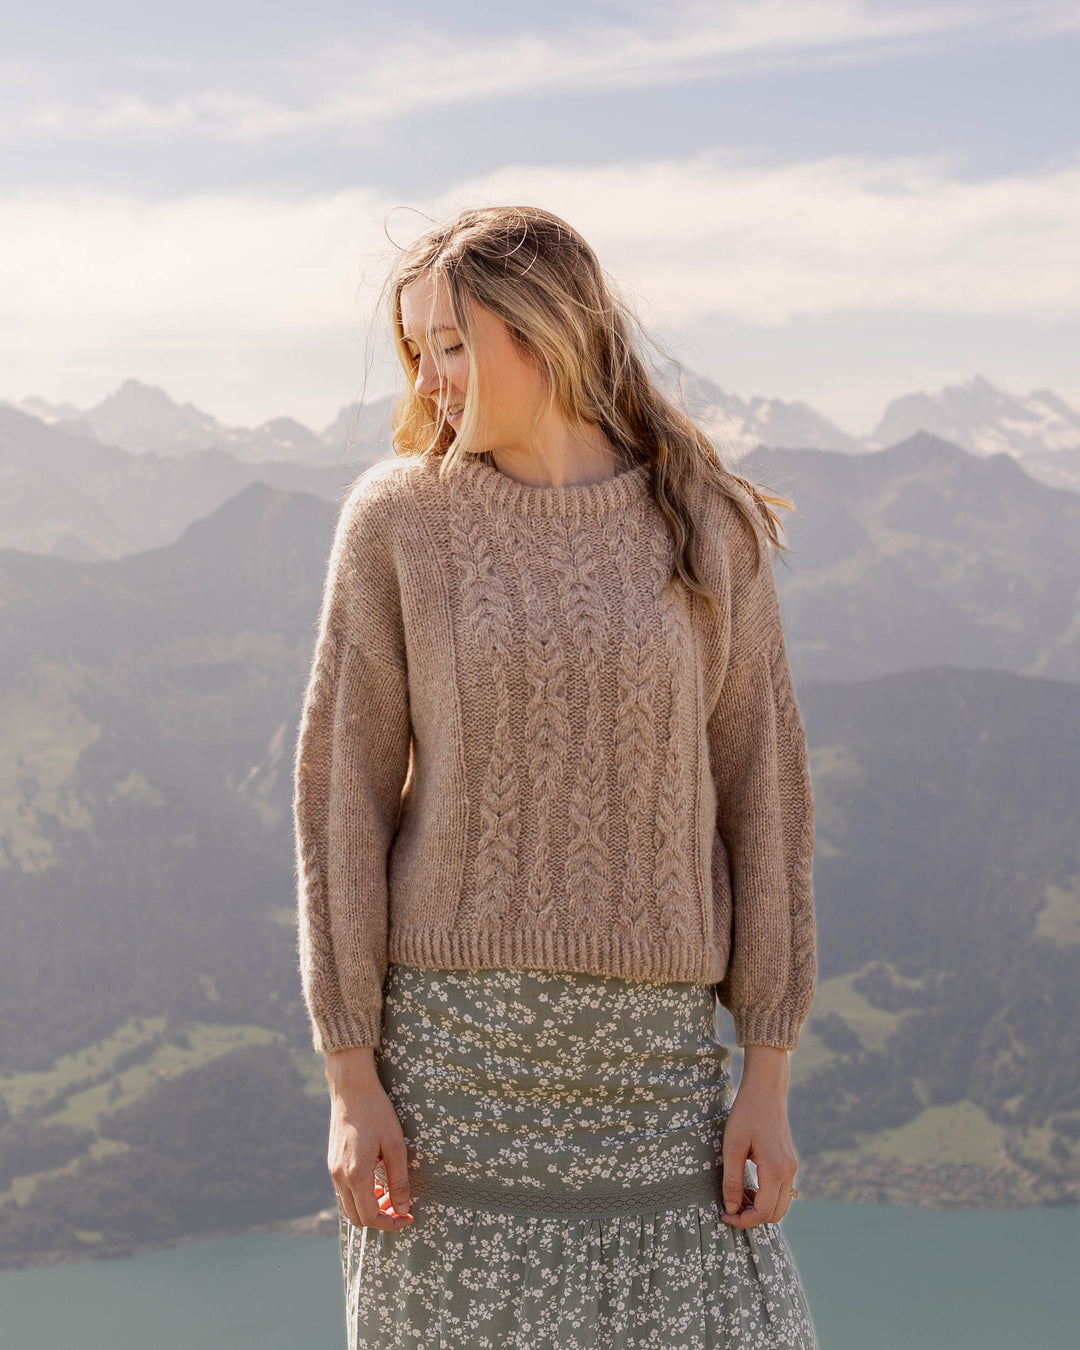
The Quinn Pullover Knitting Pattern is a modern take on a classic cable sweater. A relaxed, drop shoulder silhouette paired with intricate cables and texture create a sweater that is comfortable and timeless.

Quinn Pullover Knitting Pattern
Materials
- 4, (5, 5, 6, 6), (6, 7, 7, 7) skeins / 808, (1010, 1010, 1212, 1212), (1212, 1414, 1414, 1414) yds Lion Brand Re-Tweed Yarn (shown in Peanut Butter)
- Size US 9 (5.5 mm) 32” or longer circular knitting needles (or size needed to obtain gauge)
- US 7 (4.5 mm) 32” or longer circular knitting needles (to work bottom hem)
- US 7 (4.5 mm) double pointed needles or circular knitting needle (to work sleeve cuffs and neckband)
- Cable Needle
- Stitch Markers
- Stitch holder or scrap yarn
- Tapestry Needle to weave in ends
Notes
The Quinn Pullover is worked in the round from the bottom, up. You will separate to work the front and back pieces and join again at the shoulders using a three needle bind off. The sleeves and neckband will be worked by picking up stitches and knitting in the round.
Portions of this sweater are worked using cable stitch charts. Some experience working cable charts is helpful.
Cable charts are attached at the end of this pattern.
This pattern is written in standard US knitting terms.
Dimensions
XS, (S, M, L, XL), (2X, 3X, 4X, 5X)
Finished Bust/Chest Circumference: 37, (42, 46.5, 51, 55), (58, 62.5, 67, 71)"
Finished Length: 22, (22, 22, 22, 22), (24, 24, 24, 24)”
Pattern is written for smallest size with changes for larger sizes in parenthesis. When only one number is given, it applies to all sizes. To keep track of your size, you may highlight or circle all numbers for your chosen size before you begin.
Help Choosing Size
This sweater is designed to be worn with 8-10” of positive ease. Model is 6’ tall, has a 33” bust, and is wearing a size Small with 9” of positive ease. For best fit, choose a size that is closest to 8-10” larger than your corresponding bust measurement. For example, if you bust is 50”, you would wear a size 2X.
Gauge
15 stitches and 22 rows = 4” in moss stitch on size 9 needles
Moss stitch is a variation of seed stitch and is worked as follows:
Rows 1 and 2: *k1, p1. Rep from * across.
Rows 3 and 4: *p1, k1. Rep from * across.
Abbreviations:
This pattern is written using U.S. English Terminology
BO = bind off
CO = cast on
C1B = cable one back, also known as right cross (RC), slip 1 stitch to cable needle and hold to back of work, k1, k1 from cable needle
C1BP = cable one back purl, also known as right cross purl (RPC), slip 1 stitch to cable needle and hold to back of work, k1, p1 from cable needle
C1F = cable one front, also known as left cross (LC), slip 1 stitch to cable needle and hold to front of work, k1, k1 from cable needle
C1FP = cable one front purl, also known as left cross purl (LPC), slip 1 stitch to cable needle and hold to front of work, p1, k1 from cable needle
cn = cable needle
K = knit
k2tog = knit 2 stitches together (right leaning single decrease)
k3tog = knit 3 stitches together (right leaning double decrease)
k2togtbl = knit 2 stitches together through the back loop (left leaning single decrease)
k3togtbl = knit 3 stitches together through the back loop (left leaning double decrease)
M = stitch marker
PM = place stitch marker
RS = right side
sl1 = slip 1 stitch purlwise with the working yarn in back
SM = slip stitch marker
st = stitch
WS = wrong side
wyb = working yarn in back
[ ] = work instructions within brackets as many times as directed
- = repeat the instructions following the single asterisk as directed
Quinn Pullover Knitting Pattern
© ORIGINALLY LOVELY 2021
This pattern and photographs of this garment are property of Kaitlin Barthold of Originally Lovely. This pattern, photos, and design are subject to copyright and are for personal use only. All commercial use is strictly prohibited. You may not reproduce or distribute this pattern under any circumstances.
Purchase an ad free, printable PDF of the Quinn Pullover Knitting Pattern on Ravelry CLICK HERE
To purchase an ad free, printable PDF of the Quinn Pullover Knitting Pattern on Etsy CLICK HERE
Quinn Pullover Knitting Pattern Instructions:
With size 7 needles, cast on 140, (160, 176, 192, 204), (220, 236, 252, 268) sts using long tail tubular cast on, or cast on method of choice.
Work 2.5” in k1, p1 rib stitch.
On the next round, switch to size 9 needles.
You will now begin following the cable charts for your given size.
Set Up Round: *PM, [p1, k1] 4 (6, 8, 10, 12) (12, 14, 16, 18) times, PM, work row 1 of chart A, PM, [p1, k1] 4 (6, 8, 10, 12) (12, 14, 16, 18) times. Rep from * once more. You will now have 6 markers placed. One to denote the beg/end of each round, one to denote the halfway point, and two at the front and the back to denote where the chart will be worked.
Round 2: *SM, [p1, k1] to 1st M, SM, work row 2 of chart A, SM, [p1, k1] to next M. Rep from * once more.
3-4: *SM, [k1, p1] to 1st M, SM, work next row of chart A, SM, [k1, p1] to next M. Rep from * once more.
Continue in the pattern as established in rows 1-4 until chart A has been completed 6 times total.
Front:
Set Up Round: * work in moss st to next M, SM, work row 1 of chart A, SM, work in moss st to 2 before next M, BO next 4 sts removing marker when needed. Rep from * once more, working the final 4 BO sts with the beginning sts of the next round.
Now, you will work back and forth across the first 66, (76, 84, 92, 100), (106, 114, 122, 130) sts to shape the front. *Note: You will now be working the chart flat.
2 (RS): k1, work in moss st to 1st M, work row 2 of chart A, SM, work in moss st to last st, k1. Turn.
3 (WS): p1, work in moss st to 1st M, work row 3 of chart A, SM, work in moss st to last st, p1.
4: k1, k2togtbl, work in moss st to 1st M, work row 4 of chart A, SM, work in moss st to last 3, k2tog, k1. [64, (74, 82, 90, 98), (104, 112, 120, 128) sts].
Continue in pattern as established in rows 2-3 until you have completed the chart 1, (1, 1, 1, 1), (2, 2, 2, 2) more times.
Then, continue in pattern until you have worked rows 1-7 from the chart once more.
Right Front:
Set Up Row: k1, work in moss st to 1st M, work first 21 (21, 21, 21, 21) (23, 23, 23, 23) sts of chart B, BO next 12 (14, 14, 14, 14) (16, 16, 16, 16) sts, work remaining sts of chart, work in moss st to last st, k1.
2 (WS): p1, work in moss st to M, SM, work row 2 of the left half of chart B, turn.
3 (RS): work row 3 of chart, SM, work in moss st to last st, k1.
Continue working in pattern as established in rows 2-3 until you have completed the chart for the right front. Cut yarn leaving a tail to weave in later. Set these sts aside on st holder or scrap yarn to work left front.
Left Front:
Begin working left front with WS facing you.
2 (WS): work row 2 of the right half of chart B, SM, work in moss st to last st, p1.
3 (RS): k1, work in moss st to M, work row 3 of chart.
Continue working in pattern as established in rows 2-3 until you have completed the chart for the left front. Cut yarn leaving a tail to weave in later. Set these sts aside on st holder or scrap yarn to work back.
Back:
Begin working the 66, (76, 84, 92, 100), (106, 114, 122, 130) sts set aside for the back with RS facing you.
2 (RS): k1, work in moss st to M, SM, work row 2 of chart A, SM, work in moss st to last st, k1.
3 (WS): p1, work in moss st to M, SM, work row 3 of chart A, SM, work in moss st to last st, p1.
4: k1, k2togtbl, work in moss st to M, SM, work row 4 of chart A, SM, work in moss st to last 3, k2tog, k1. [64, (74, 82, 90, 98), (104, 112, 120, 128) sts].
Continue in pattern as established in rows 2-3 until you have worked the chart 2, (2, 2, 2, 2), (3, 3, 3, 3) more times.
Then, continue in pattern until you have worked rows 1-11 from the chart once more.
Left Back:
Set Up Row: k1, work in moss st to 1st M, work first 16 (16, 16, 16, 16) (18, 18, 18, 18) sts of chart C, BO next 22 (24, 24, 24, 24) (26, 26, 26, 26) sts, work remaining sts of chart, work in moss st to last st, k1.
2 (WS): p1, work in moss st to M, SM, work row 2 of the left half of chart C, turn.
3 (RS): work row 3 of chart, SM, work in moss st to last st, k1.
Continue working in pattern as established in rows 2-3 until you have completed the chart for the left back.
Next, arrange the shoulder pieces so that the right sides are facing of the left back and the left front. Work a 3 needle bind off to join.
Right Back:
Begin working right back with WS facing you.
2 (WS): work row 2 of the right half of chart C, SM, work in moss st to last st, p1.
3 (RS): k1, work in moss st to M, work row 3 of chart.
Continue working in the pattern as established in rows 2-3 until you have completed the chart for the right back.
Next, arrange the shoulder pieces so that the right sides are facing of the right back and the right front. Work a 3 needle bind off to join.
Sleeves:
With RS facing and beginning at the underarm, pick up 3 sts along one side of the underarm, pick up 26 (27, 27, 29, 29) (33, 33, 35, 35) sts around the armhole opening to the top of shoulder (this is about 2 sts per every 3 rows), pick up 26 (27, 27, 29, 29) (33, 33, 35, 35) sts down the other side of the armhole opening, pick up 3 sts along the other side of the underarm. PM to denote beg/end of each round. [58, (60, 60, 64, 64), (72, 72, 76, 76) sts].
Round 1: work 17 (18, 18, 20, 20) (24, 24, 26, 26) sts in moss st, PM, work row 1 of chart D, PM, work in moss st to end of round.
2: work in moss st to first M, SM, work row 2 of chart D, SM, work in moss st to end of round.
3 (decrease row): k2tog, work in moss st to first M, SM, work row next row of chart, SM, work in moss st to last 2, k2togtbl. [56, (58, 58, 62, 62), (70, 70, 74, 74) sts].
Continue working in pattern as established in rows 1-2 decreasing every 6 (6, 6, 6, 6) (4, 4, 4, 4)th row until you have 38 (40, 40, 40, 42) (42, 42, 44, 44) sts remaining.
Then, continue working in pattern until you have completed chart D six times. You may work more/less at this point to make your sleeves longer/shorter.
On the next row, switch to size 7 needles. Work 2” in k1, p1 rib stitch.
Bind off using the tubular BO method.
Repeat for second sleeve.
Neckline:
Next, using size 7 needles, begin picking up stitches to the right of the stitches bound off for the back neckline. Pick up 26 (28, 28, 28, 28) (30, 30, 30, 30) sts along the back neckline, 27 sts along left shoulder, 14 (16, 16, 16, 16) (18, 18, 18, 18) sts across the center front, and 27 stitches along the right shoulder. [94, (98, 98, 98, 98), (102, 102, 102, 102) sts total].
Join to work in round. PM to denote beg/end of each round.
Work in k1, p1 rib stitch until neckband measures 3”. Bind off loosely. Then, fold the neckband in and seam to the inner edge to create a foldover neckband.
Finishing:
To finish, weave in all ends to secure. Block by soaking in warm water and lay flat. Adjust your cables so they lay nicely and let dry
completely. Enjoy!
Quinn Pullover Knitting Pattern Charts
Note: If you click on the chart for your given size, it will open the full size image in a new tab. This might make it easier to see depending the browser you are using.
XS Quinn Chart A

S, M, L, XL Quinn Chart A

2X, 3X, 4X, 5X Quinn Chart A

XS Quinn Chart B (front neckline)

S, M, L, XL Quinn Chart B (front neckline)

2X, 3X, 4X, 5X Quinn Chart B (front neckline)

XS Quinn Chart C (back neckline)

S, M, L, XL Quinn Chart C (back neckline)

2X, 3X, 4X, 5X Quinn Chart C (back neckline)

All Sizes Quinn Chart D (sleeve)

Moss Stitch

I hope that you've enjoyed this pattern!