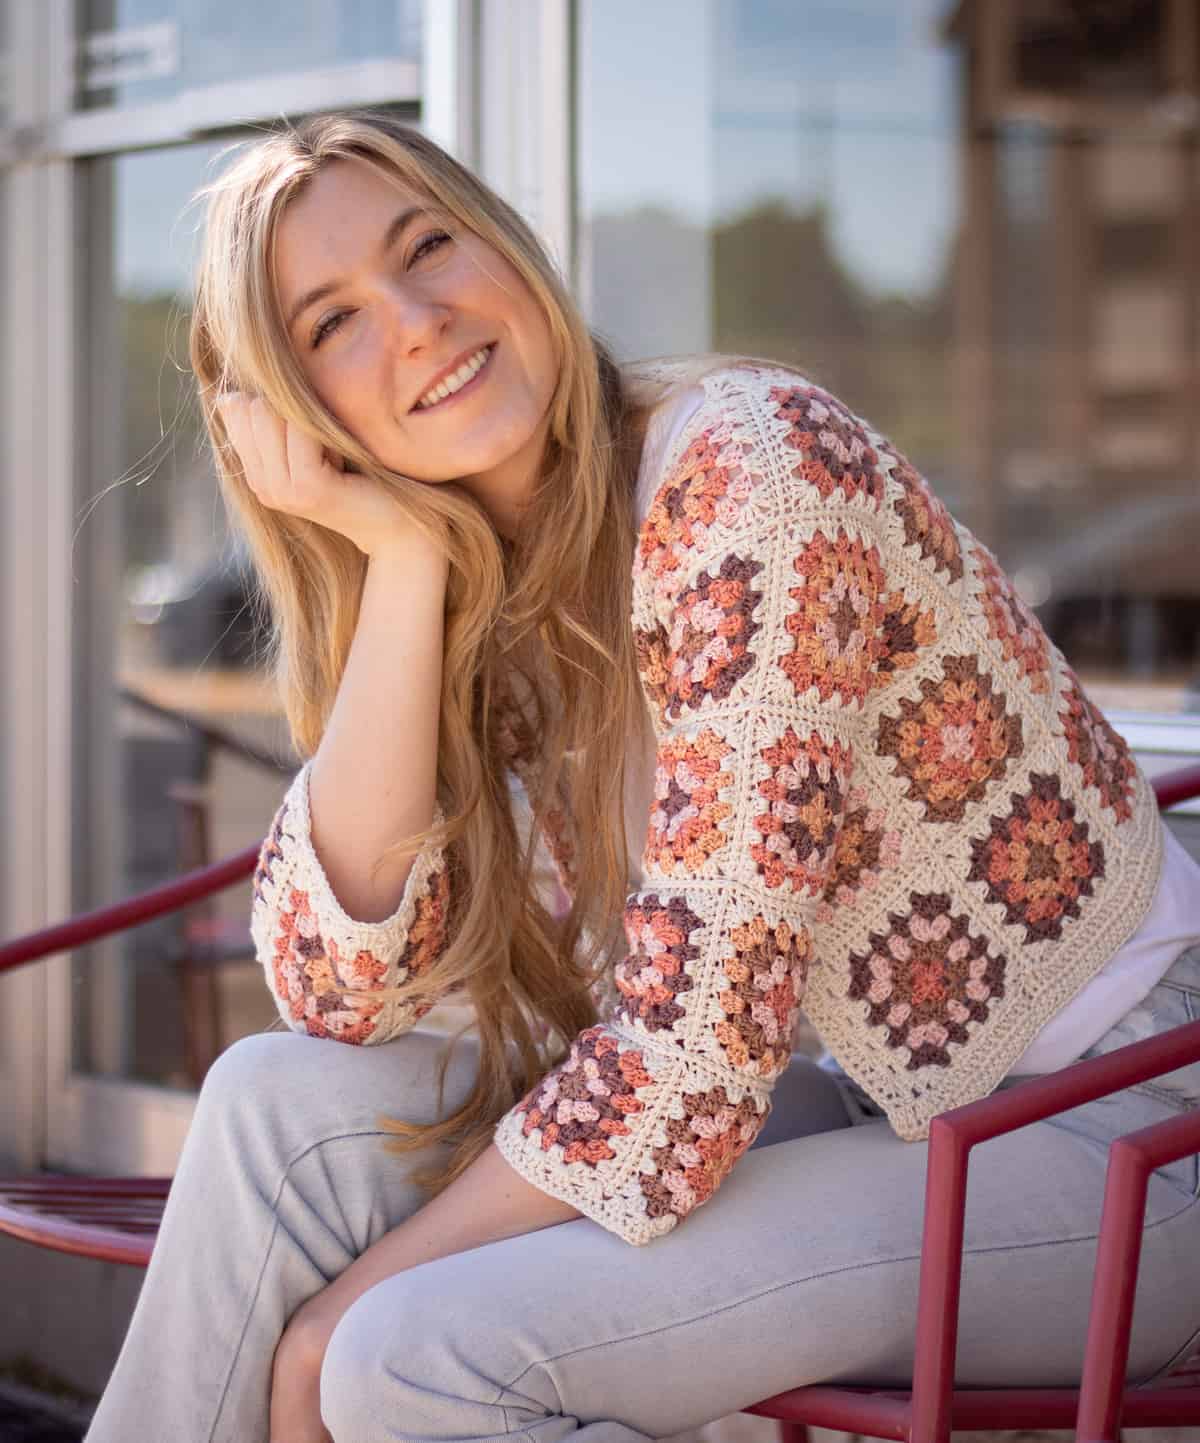
Granny Square Cardigan Crochet Pattern
Introducing: The Granny Square Cardigan — free crochet pattern
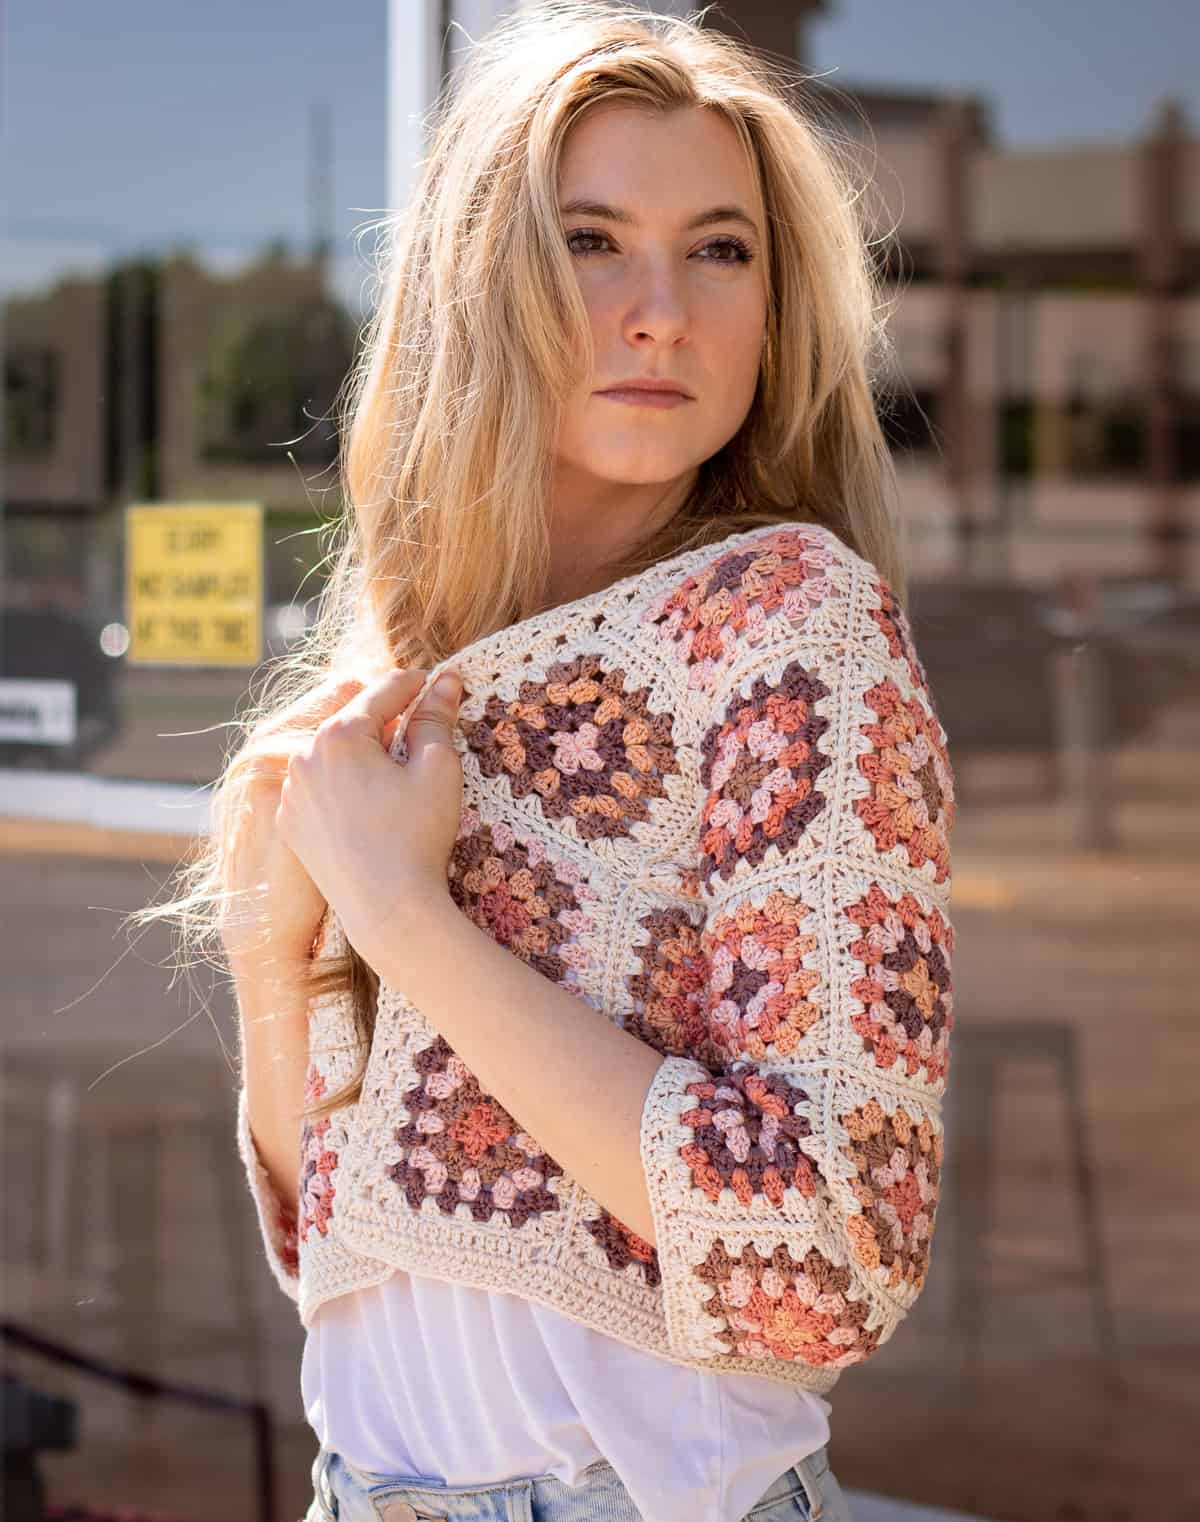
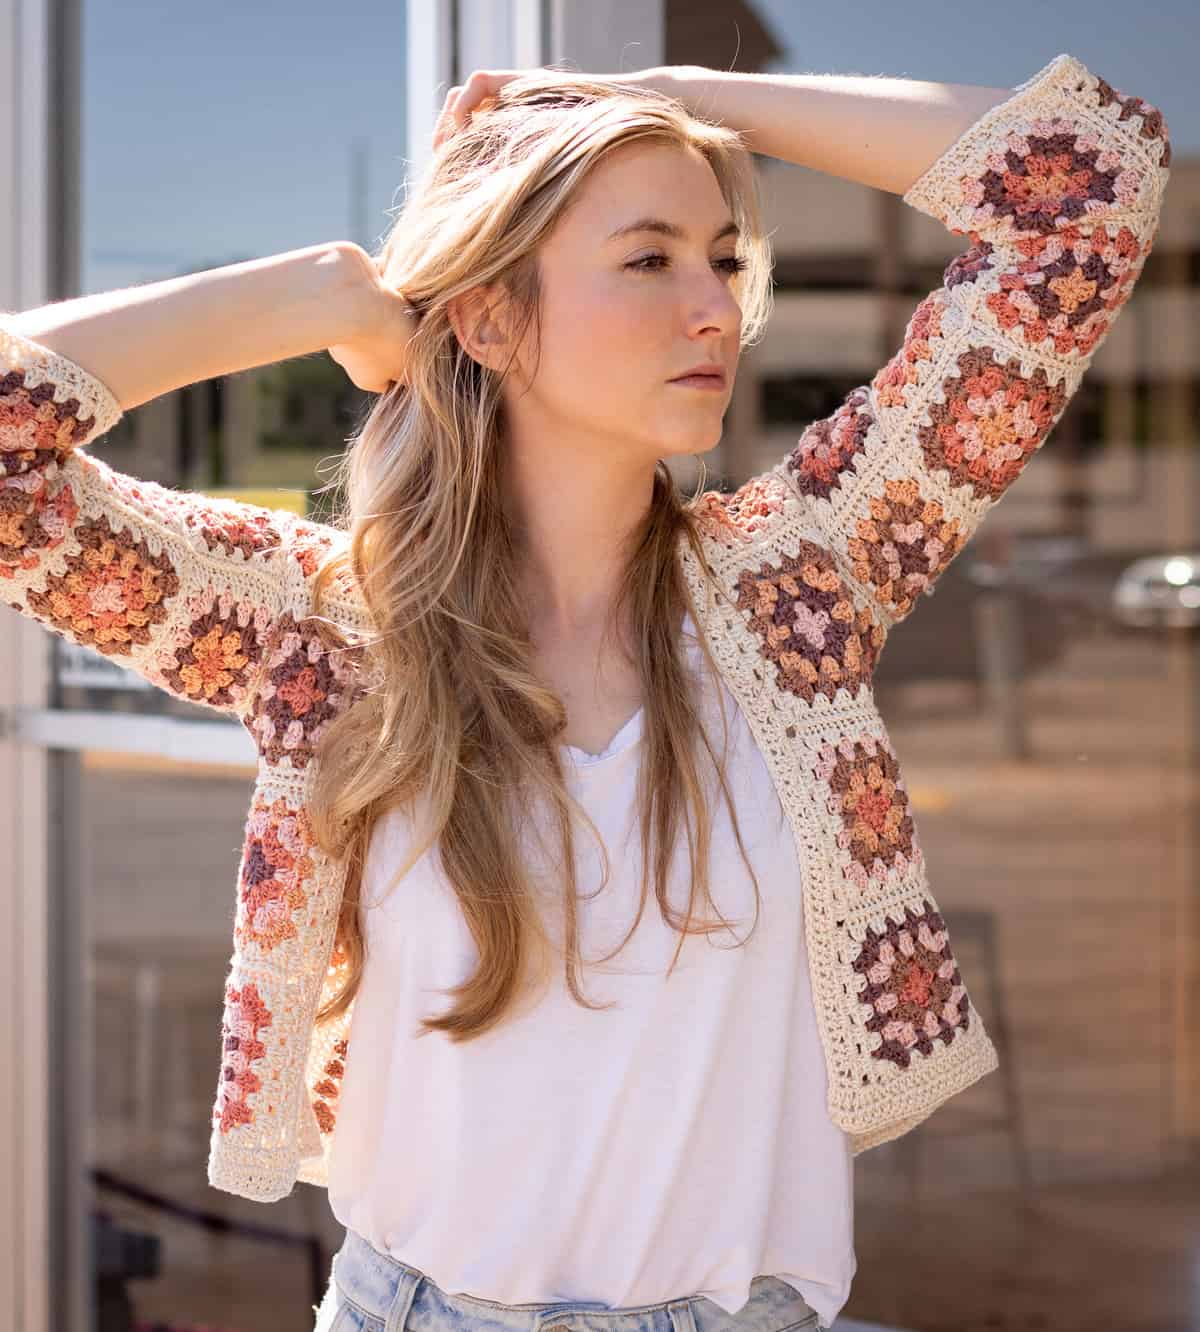
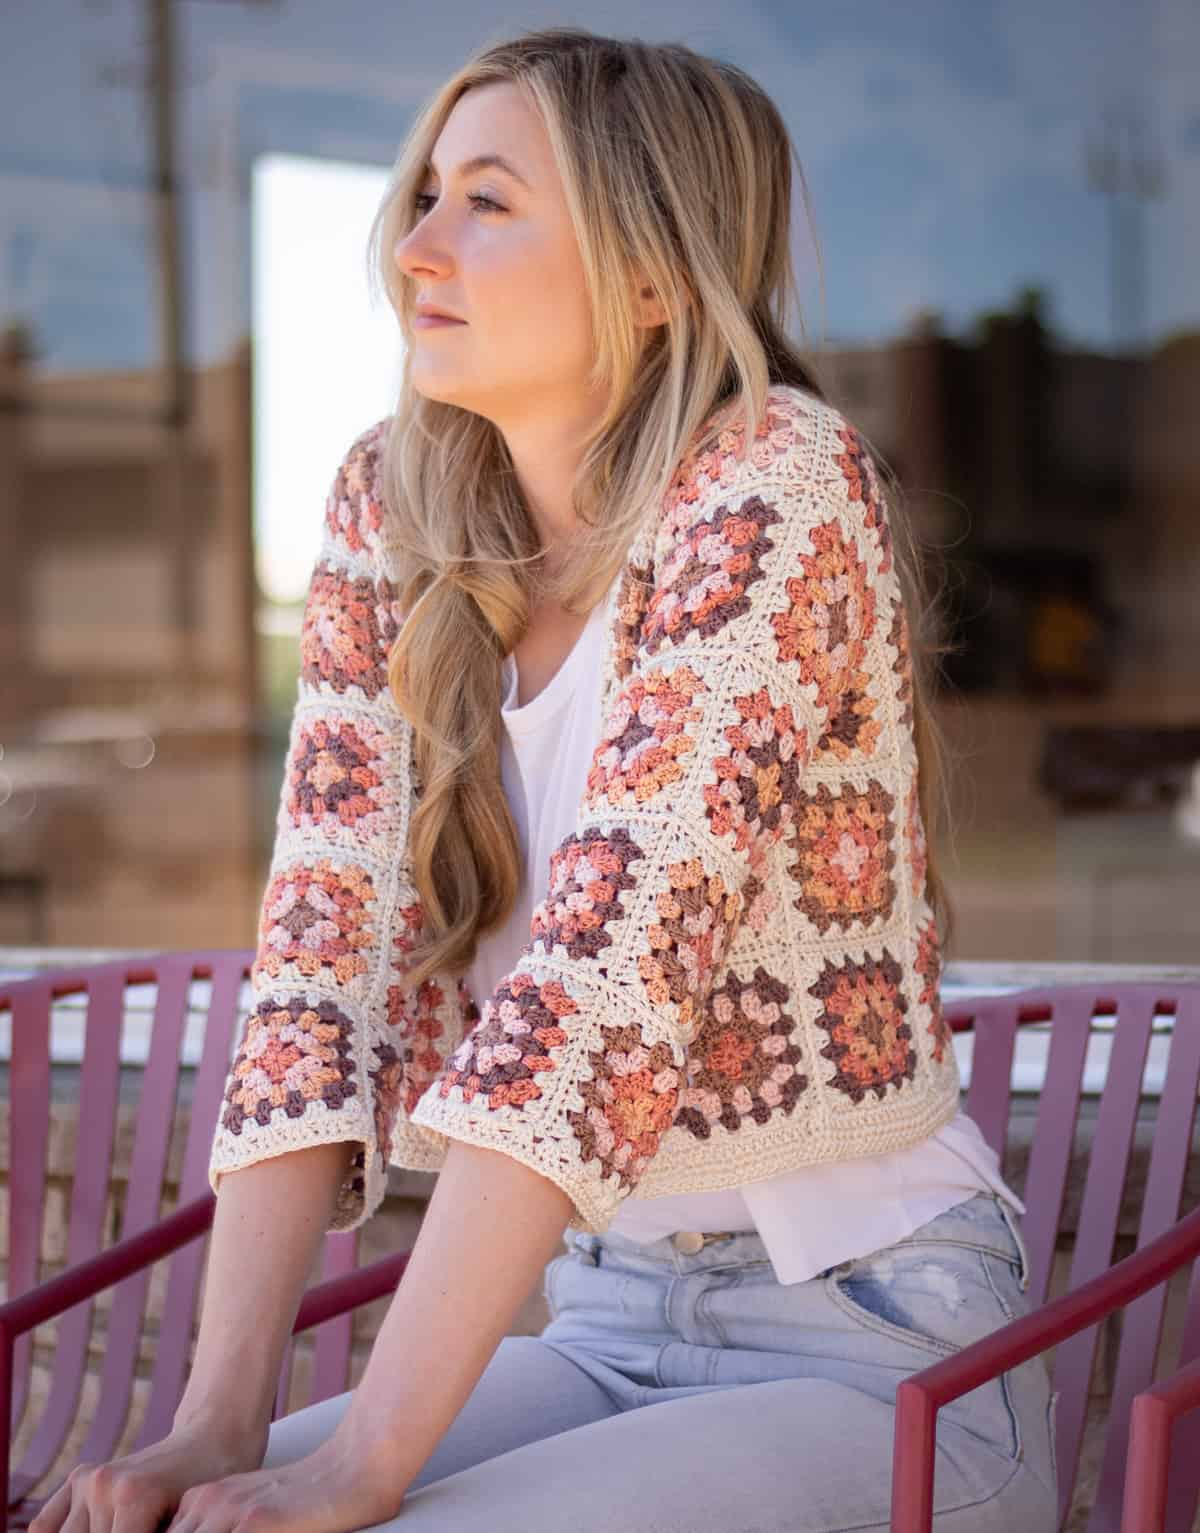
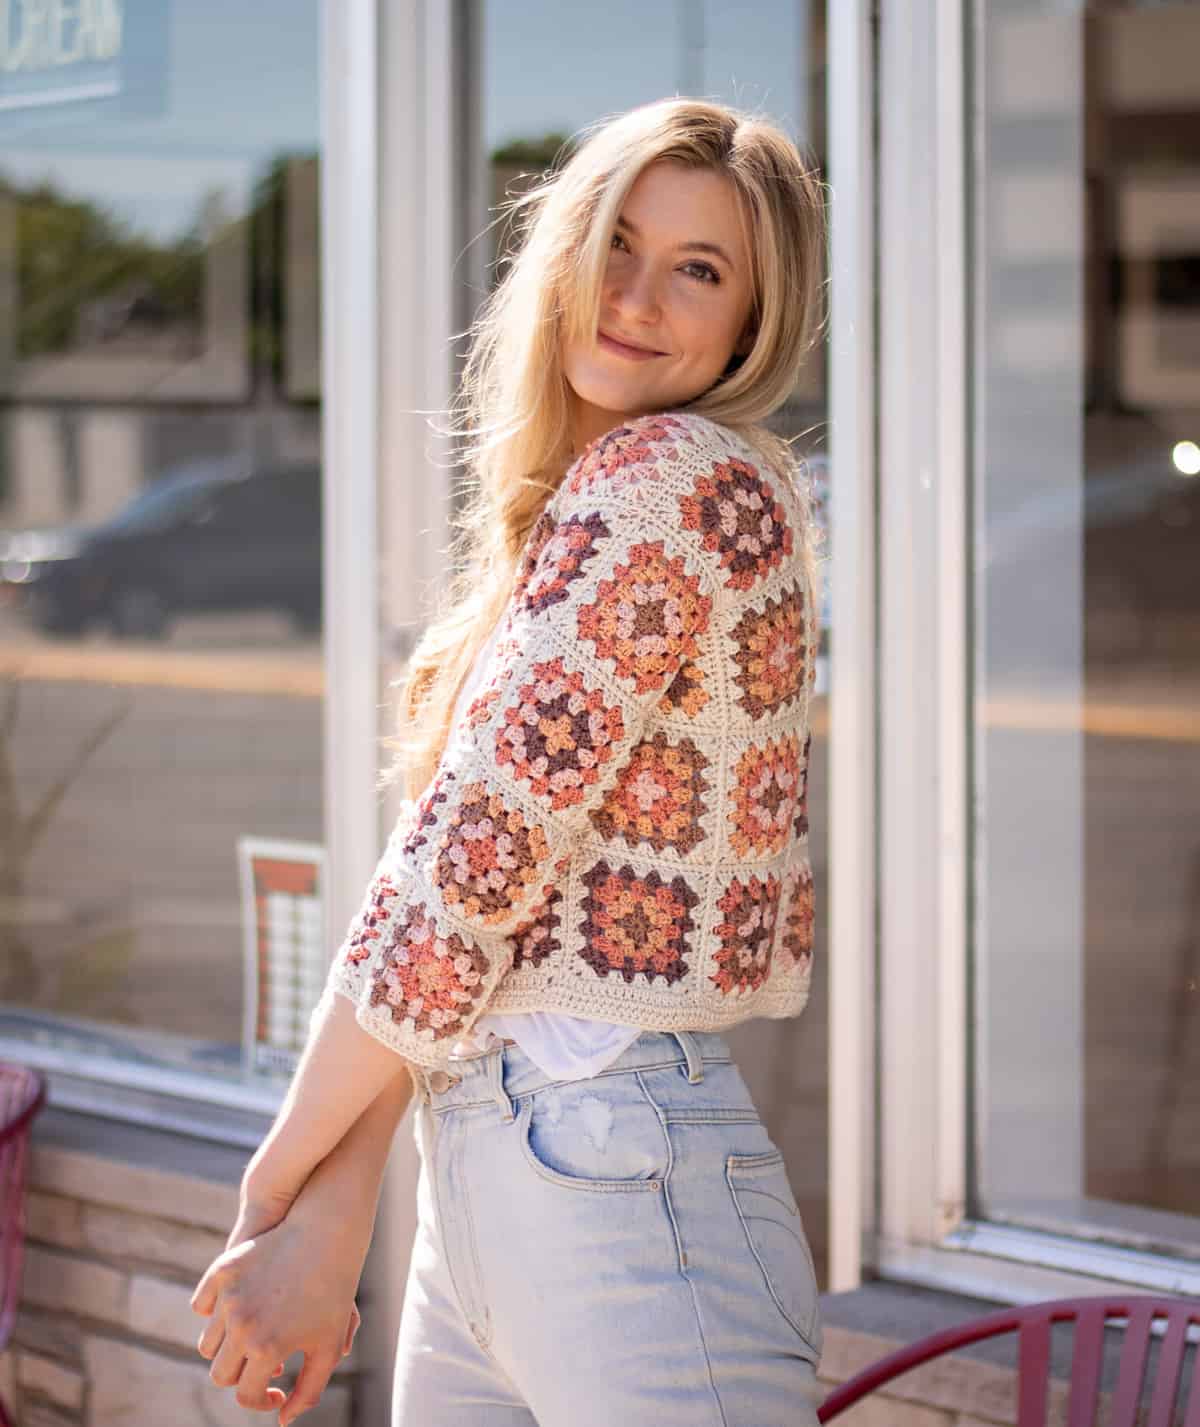
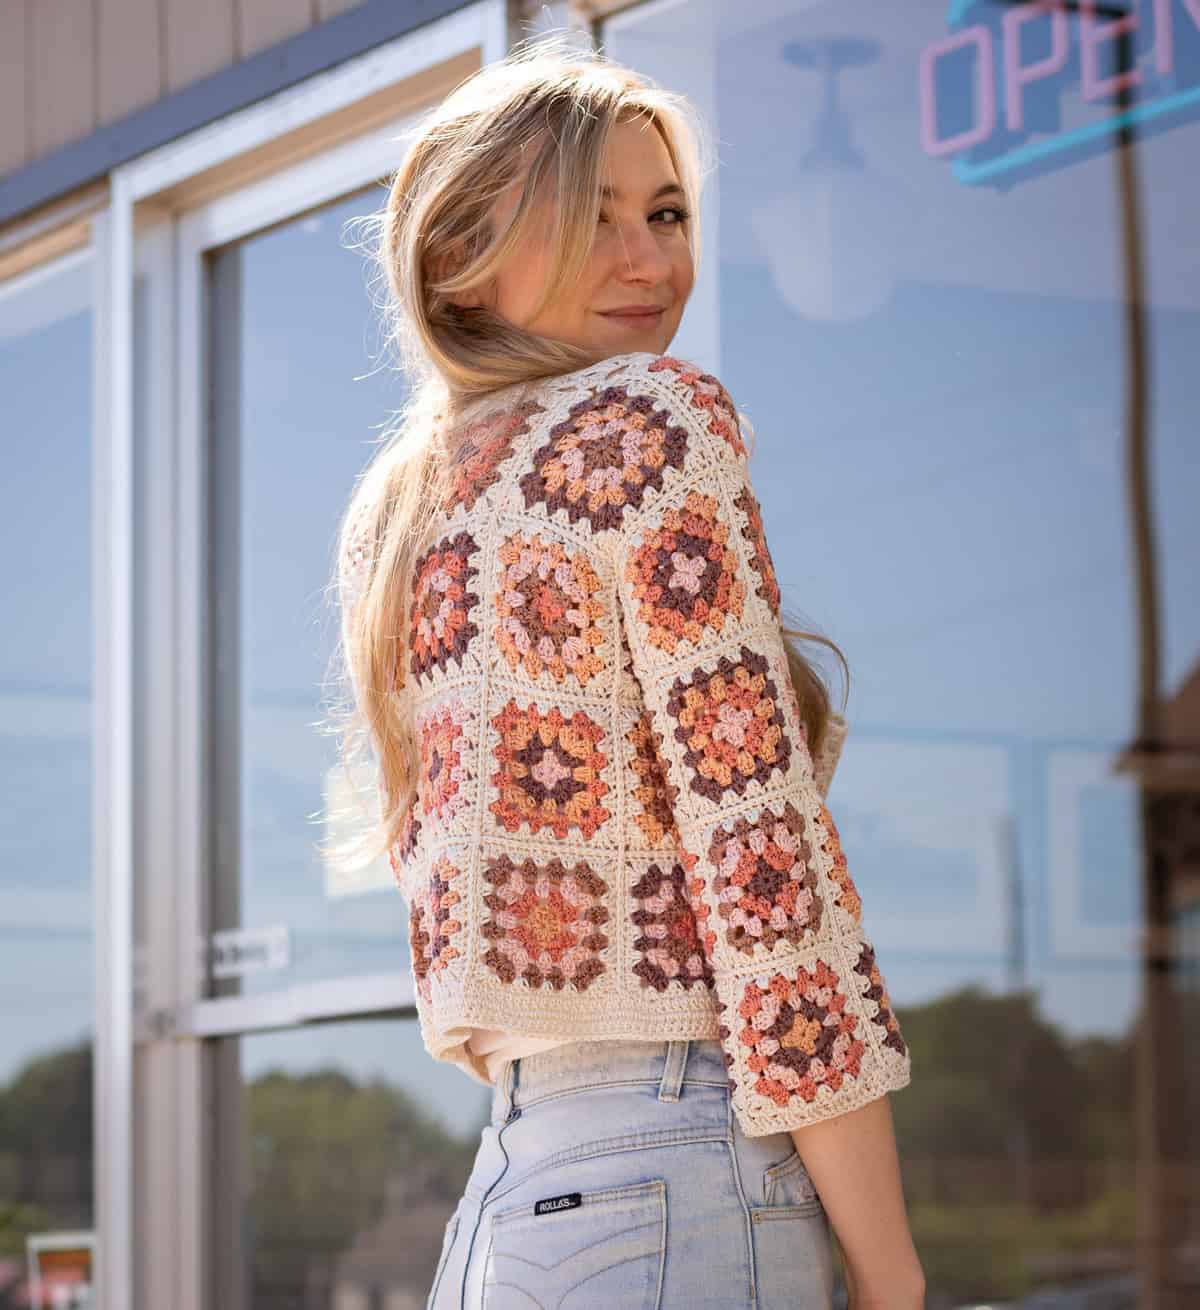
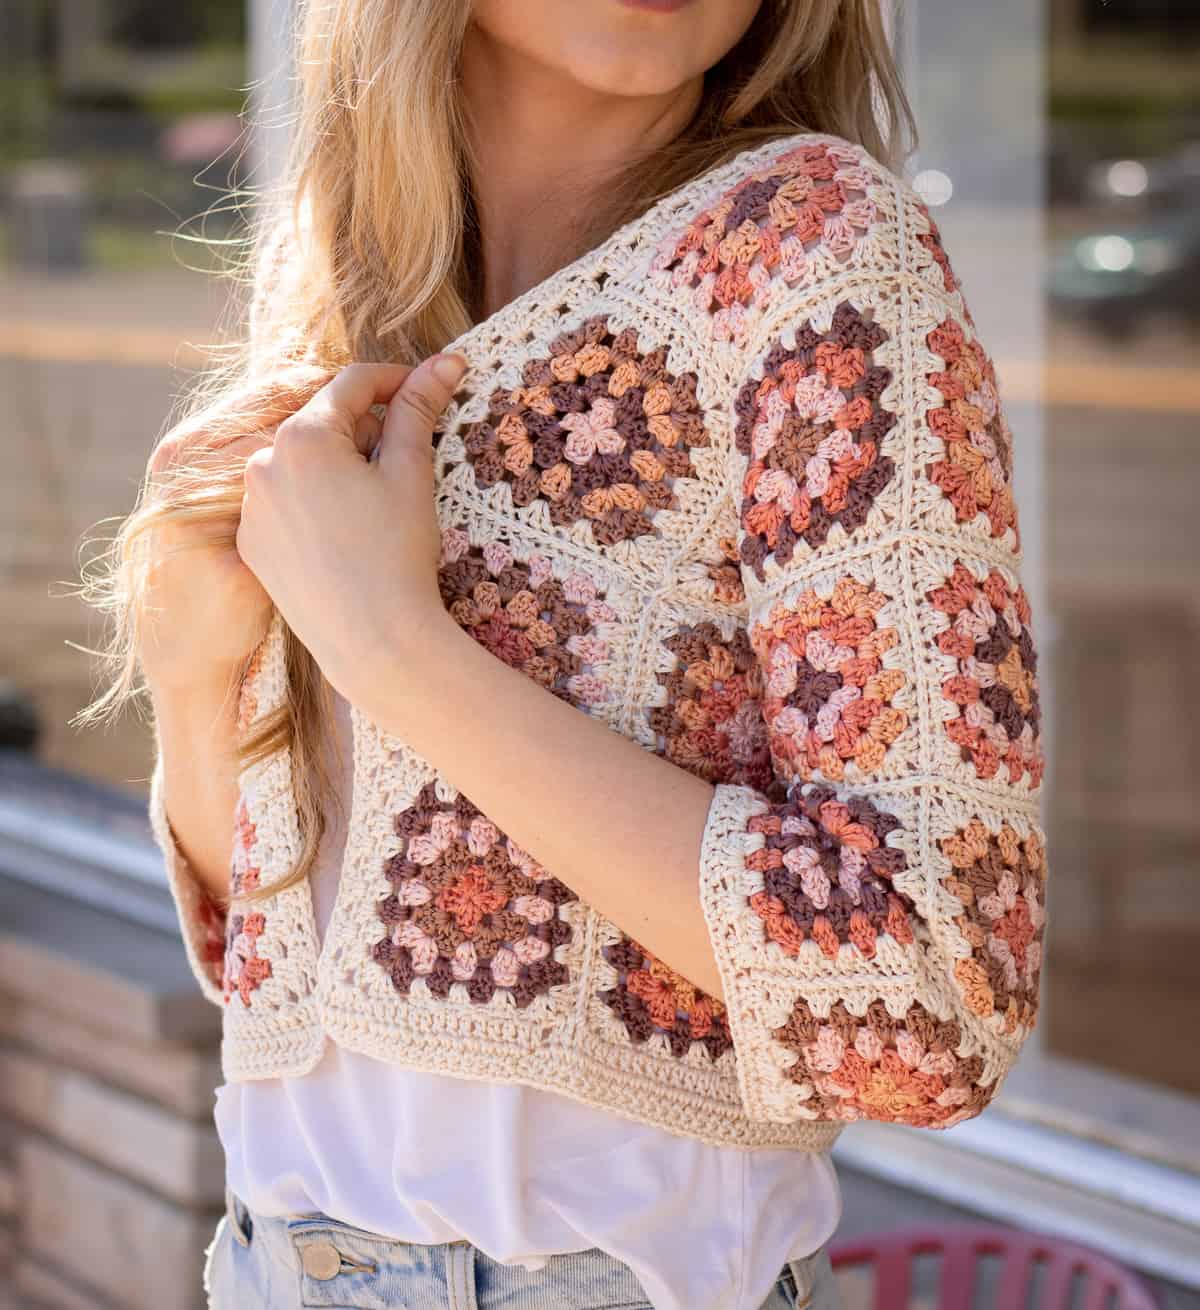
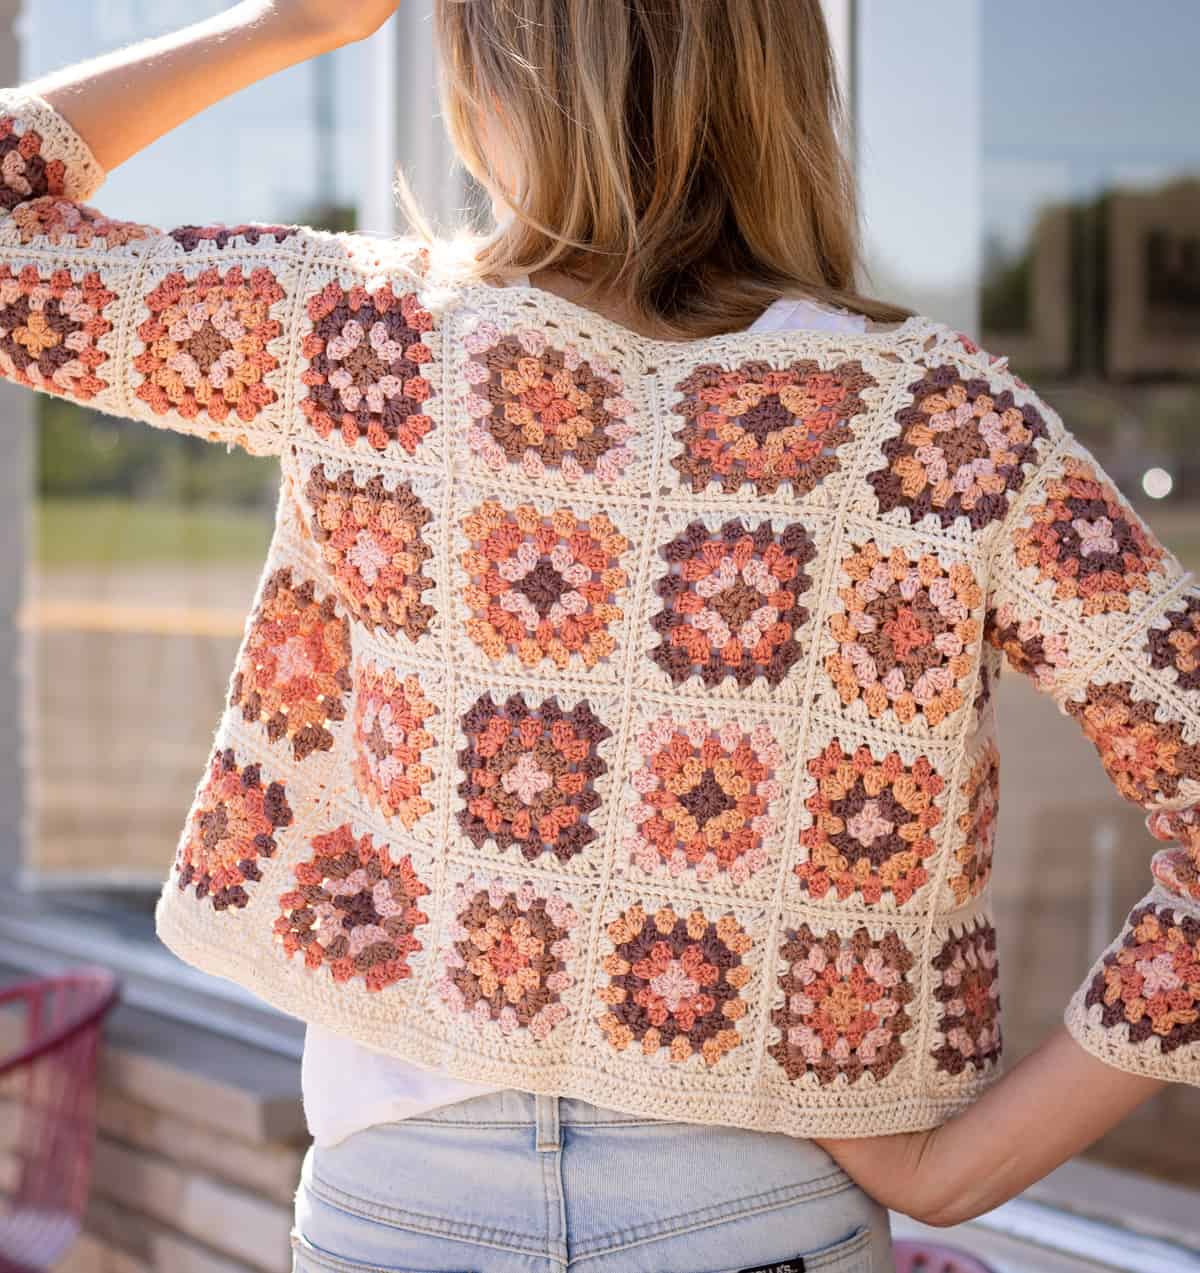
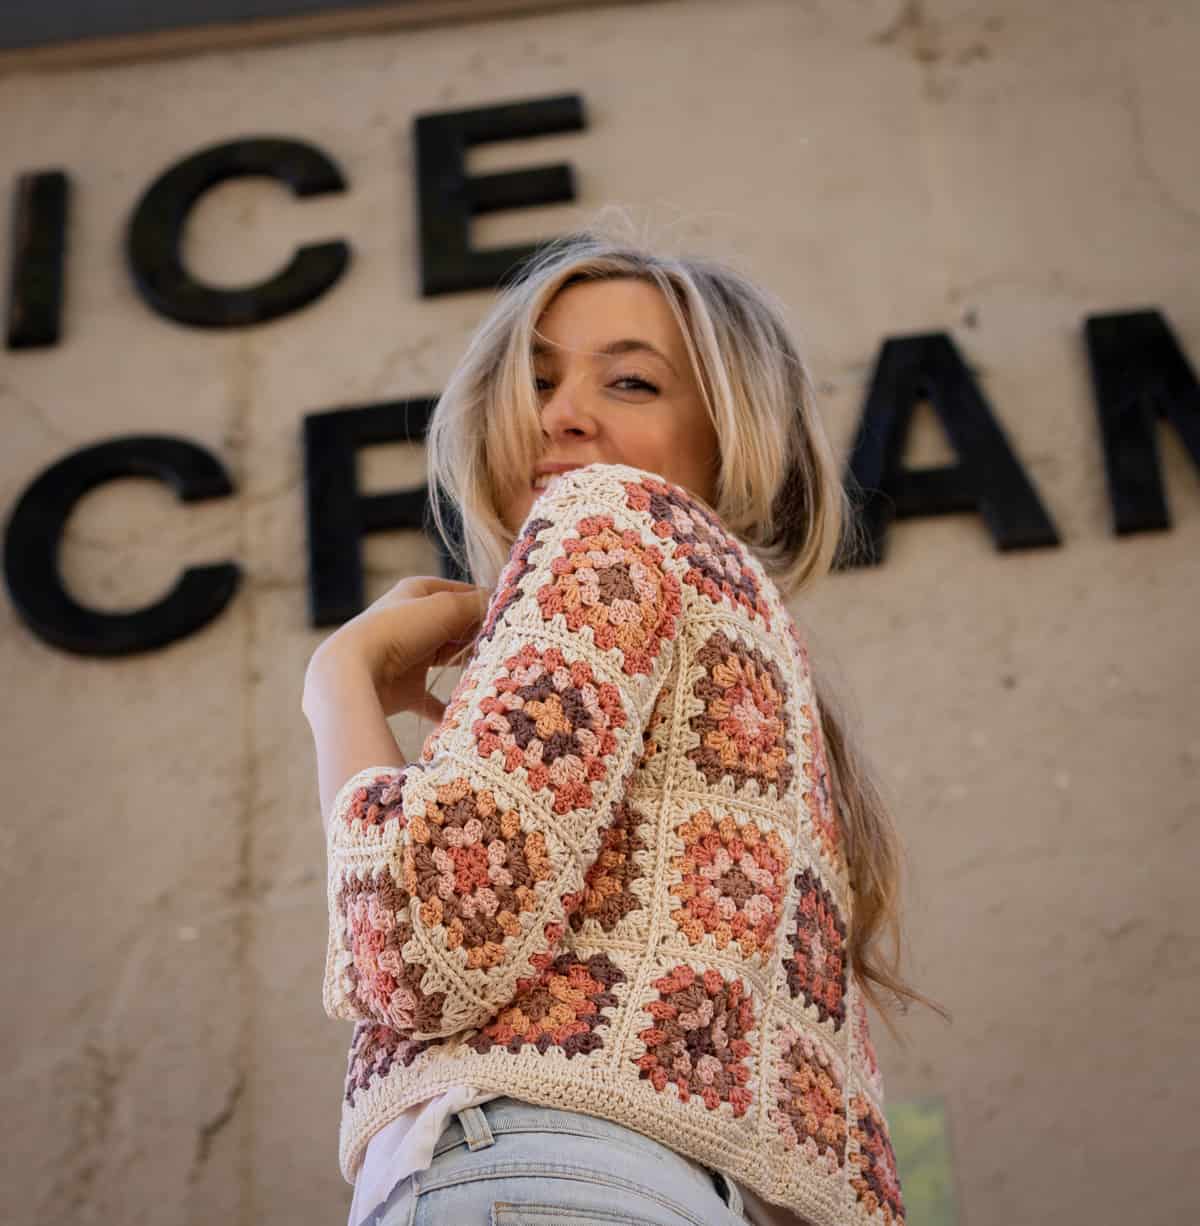
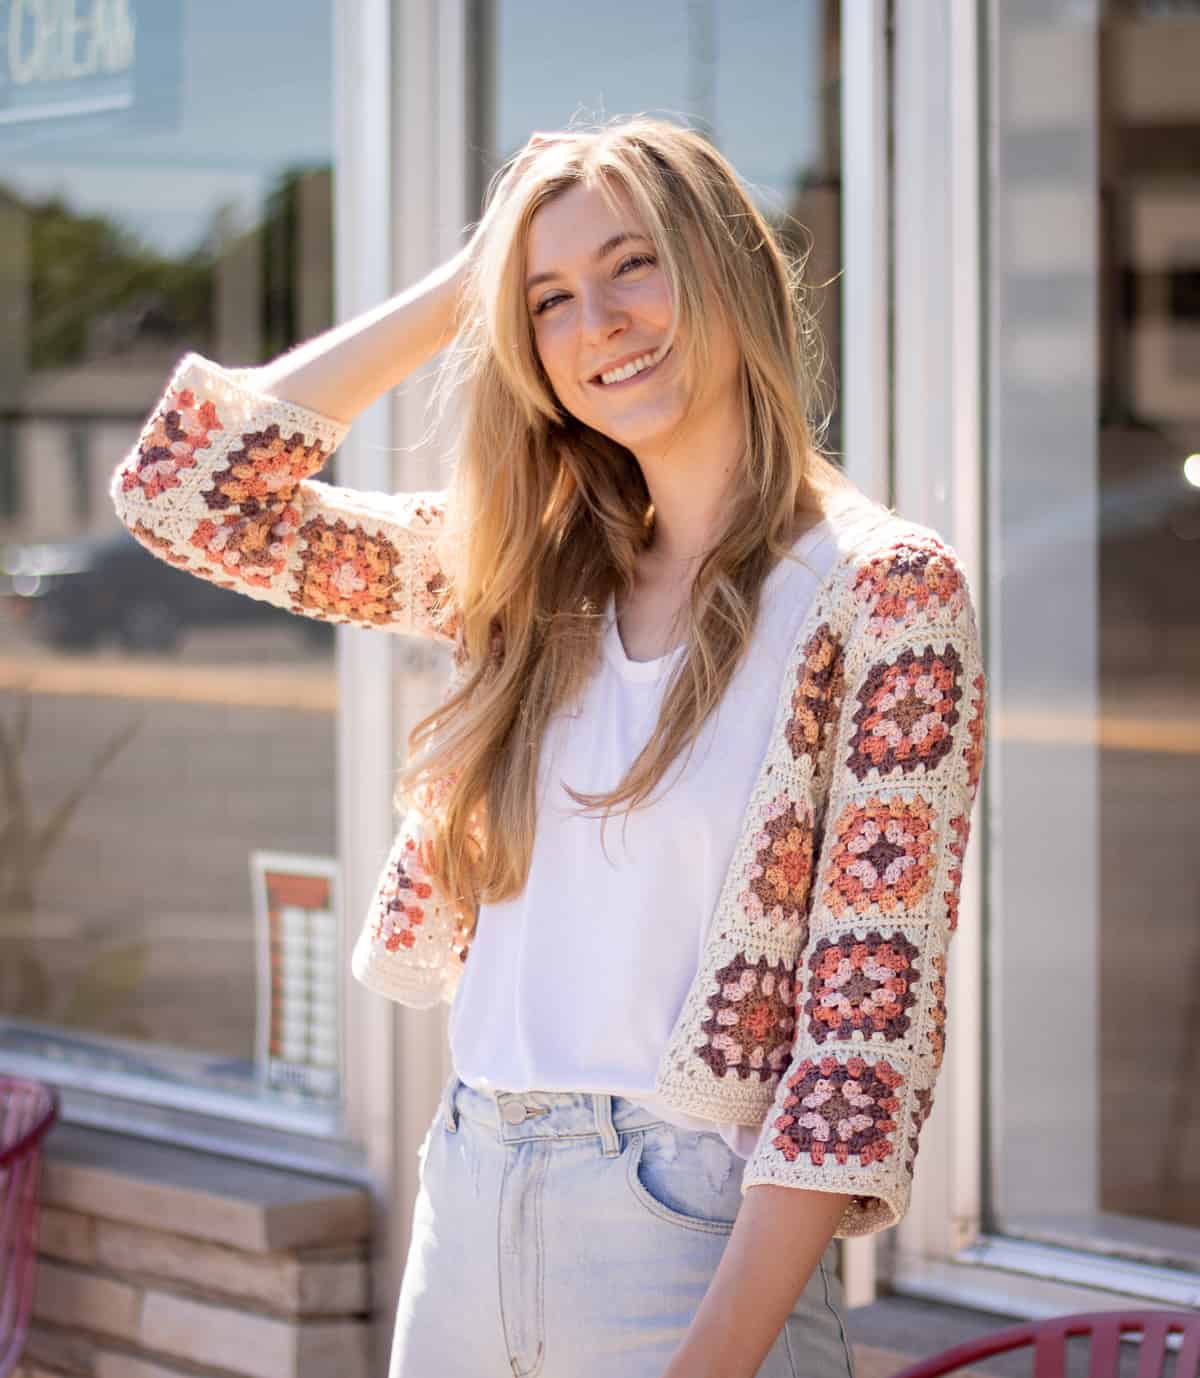
This modernized version of a classic granny square cardigan features a cropped silhouette, dropped shoulders, and unique gusset style construction that allows for a great fit! Choose a couple colors or many, this cardigan is a beautiful statement piece for your warm weather wardrobe!
Available as a free pattern and as a kit with Lion Brand Yarn.
Scroll down to access the free pattern, find the granny square video tutorial, or continue reading to learn a bit about the design and some pointers to help you out!
**please note, some links may be affiliate links which will allow me to make a small commission on products purchased through my referral. This does not influence my opinion or the price of the item that you are purchasing in any way.
Granny Square Cardigan Design
Granny Squares are one of my favorite designs in crochet. I love the vintage inspired, colorful look! I even made a whole post dedicated to my favorite granny square patterns! The Maria Top that I designed last summer uses also granny stitch in an allover sweater design.
I designed this cardigan with the vintage, oversize, granny square cardigans in mind. I love the look of those cardigans but I think that they are such a statement piece and don’t get enough use.
In my opinion my vintage inspired granny square cardigan is much more wearable. The slightly cropped silhouette looks put together and more warm weather appropriate, and the wider, open front is cute and feminine.
I also love the way the sleeves are constructed using a gusset technique. This gives it a better fit because it’s more three dimensional. Therefore, you can wear it slightly more fitted and not oversize!
Yarn and Materials
The yarn that I used for this cardigan is Lion Brand Nuboo in the colors blush, peach, mocha, walnut, and salmon. For the main color, I used white. I chose this yarn because it had tons of colors for a unique palette and land the fibers are a bit silky. I love the silky look with granny squares, it just adds another dimension to the texture and makes them look so luxurious!
This cardigan can be made using a few colors, or many. I used 5 colors in addition to white and randomized the order each time. If you shop the kit with Lion Brand Yarn, you can choose any combination of colors you want to make a palette that is your style!
Yarn Substitutions
I will note, the yarn I used is very ‘splitty’ meaning your hook can easily split through the strands. It doesn’t break the strands, just kind of misses that part! Personally, I don’t mind this too much but if this is something that bothers you you might want to use another yarn. I have some of my favorite options listed below!
- Coboo by Lion Brand Yarn: this yarn is super similar to Nuboo but doesn’t have the shine. This yarn is so cool to the touch and actually my #1 favorite yarn of all time. It is a bit splitty as well, but again I don’t really mind.
- Truboo by Lion Brand: similar to Coboo and Nuboo, this yarn is cool to the touch but is the shiniest of the three! Use this yarn if you love the silky look. Also check out Truboo Sparkle!
- LB Collection Superwash Merino: a great 100% merino wool option if you are looking for a colder weather cardigan!
- CotLin from KnitPicks: this yarn is a very matte, cotton linen blend. I love this yarn. The linen makes it surprisingly cool and comfortable! It is a little more of your typical cotton yarn and can be a bit heavy.
- Gloss DK from KnitPicks: this yarn is a merino wool and silk blend so its extremely luxurious! Great option for a colder weather cardigan that still has that ‘shine’ look to it.
As always, be sure to gauge swatch, especially when substituting yarn. Small differences in gauge can lead to large changes in the size of the finished item!

Granny Square Cardigan Crochet Pattern
© ORIGINALLY LOVELY 2021
This pattern and photographs of this garment are property of Kaitlin Barthold of Originally Lovely. This pattern, photos, and design are subject to copyright and are for personal use only. All commercial use is strictly prohibited. You may not reproduce or distribute this pattern under any circumstances.
The free version of this pattern must be viewed from the webpage.
Shop the kit with Lion Brand Yarn HERE
To purchase an ad-free, printable PDF of the Granny Square Cardigan on Ravelry, CLICK HERE
To purchase an ad-free, printable PDF of the Granny Square Cardigan on Etsy, CLICK HERE
Skill Level
Easy +
Materials
9, (14, 16, 18) skeins / 1413, (2198, 2512, 2826) yards Lion Brand Nuboo Yarn:
- 3, (5, 6, 7) skeins Main Color (shown in White)
- 2, (2, 2, 3) skeins accent color 1 (shown in Blush)
- 1, (2, 2, 3) skeins accent color 2 (shown in Peach)
- 1, (2, 2, 3) skeins accent color 3 (shown in Mocha)
- 1, (2, 2, 2) skeins accent color 4 (shown in Walnut)
- 1, (1, 2, 2) skeins accent color 5 (shown in Salmon)
Size US 7 (4.5 mm) crochet hook (favorites linked here)
Tapestry Needle to weave in ends
Notes:
This cardigan is shaped by working 4” x 4” granny squares and seaming them together.
- Because you are changing colors after each round, this project will create lots of ends. It is highly recommended to weave in your ends as you work. Tying knots instead of weaving in ends is not recommended.
- Portions of this pattern are written in crochet shorthand. This means that if you see 3DC, you will work 3 DC stitches into the same st and 2DC means 2 DC sts in to the same st.
- Unless otherwise noted, the starting/turning chains in this pattern will count as the first stitch.
- This cardigan is created using 5 coordinating accent colors and a main color. There is no order to which accent color to use next, work each square randomly in a color pattern that looks good to you, careful not to use two similar colors right next to eachother (in my case, Walnut and Mocha looked similar so I made sure they were not worked consecutively). Also, be sure not to use too much of one color as you may run out of that color sooner, try to use them equally.
- Granny squares are created by working granny stitch in rounds, increasing at the corners to create a square. There are many techniques to create granny squares. The technique we will be using in this pattern will be to turn at the end of each row to prevent the squares from twisting. For a full video tutorial on making these squares, visit https://www.youtube.com/originallylovely
Finished Dimensions:
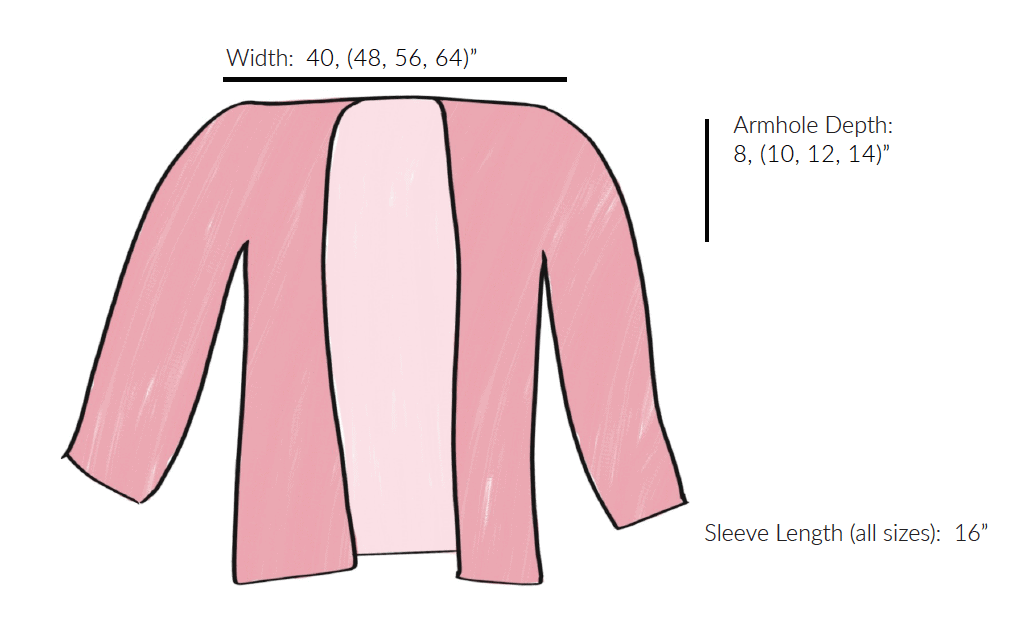
| XS/S | M/L | XL/2X | 3X/4X | |
| Bust | 40 | 48 | 56 | 64 |
| Finished Width | 20 | 24 | 28 | 32 |
| Finished Length | 20 | 22 | 24 | 26 |
XS/S, (M/L, XL/2X, 3X/4X)
Pattern is written for smallest size with changes for larger sizes in parenthesis. When only one number is given, it applies to all sizes. To keep track of your size, you may highlight or circle all numbers for your chosen size before you begin.
Help Choosing Size
This top is designed to be worn with 0-6” of positive ease at the bust. Model is 6’ tall, has a 33” bust, and is wearing a size small with 3” of positive ease. For best fit, choose a size that is 0-6” larger than your corresponding bust measurement.
Gauge
15 sts and 10 rows = 4” in granny stitch
NOTE: This means each granny square should measure 4″ by 4″. If you are substituting different yarn, be sure to check gauge so that your finished cardigan fits properly!
Abbreviations
This pattern is written using U.S. English Terminology
[ ] = work instructions within brackets as directed
( ) = work instructions within parentheses as directed
Ch = chain stitch
DC = double crochet
MC = main color
MR = magic ring
Rd = round
SC = single crochet
SLST = slipped stitch
Sp = space
St = stitch
Sts = stitches
Rd= round
Granny Square Cardigan Crochet Pattern
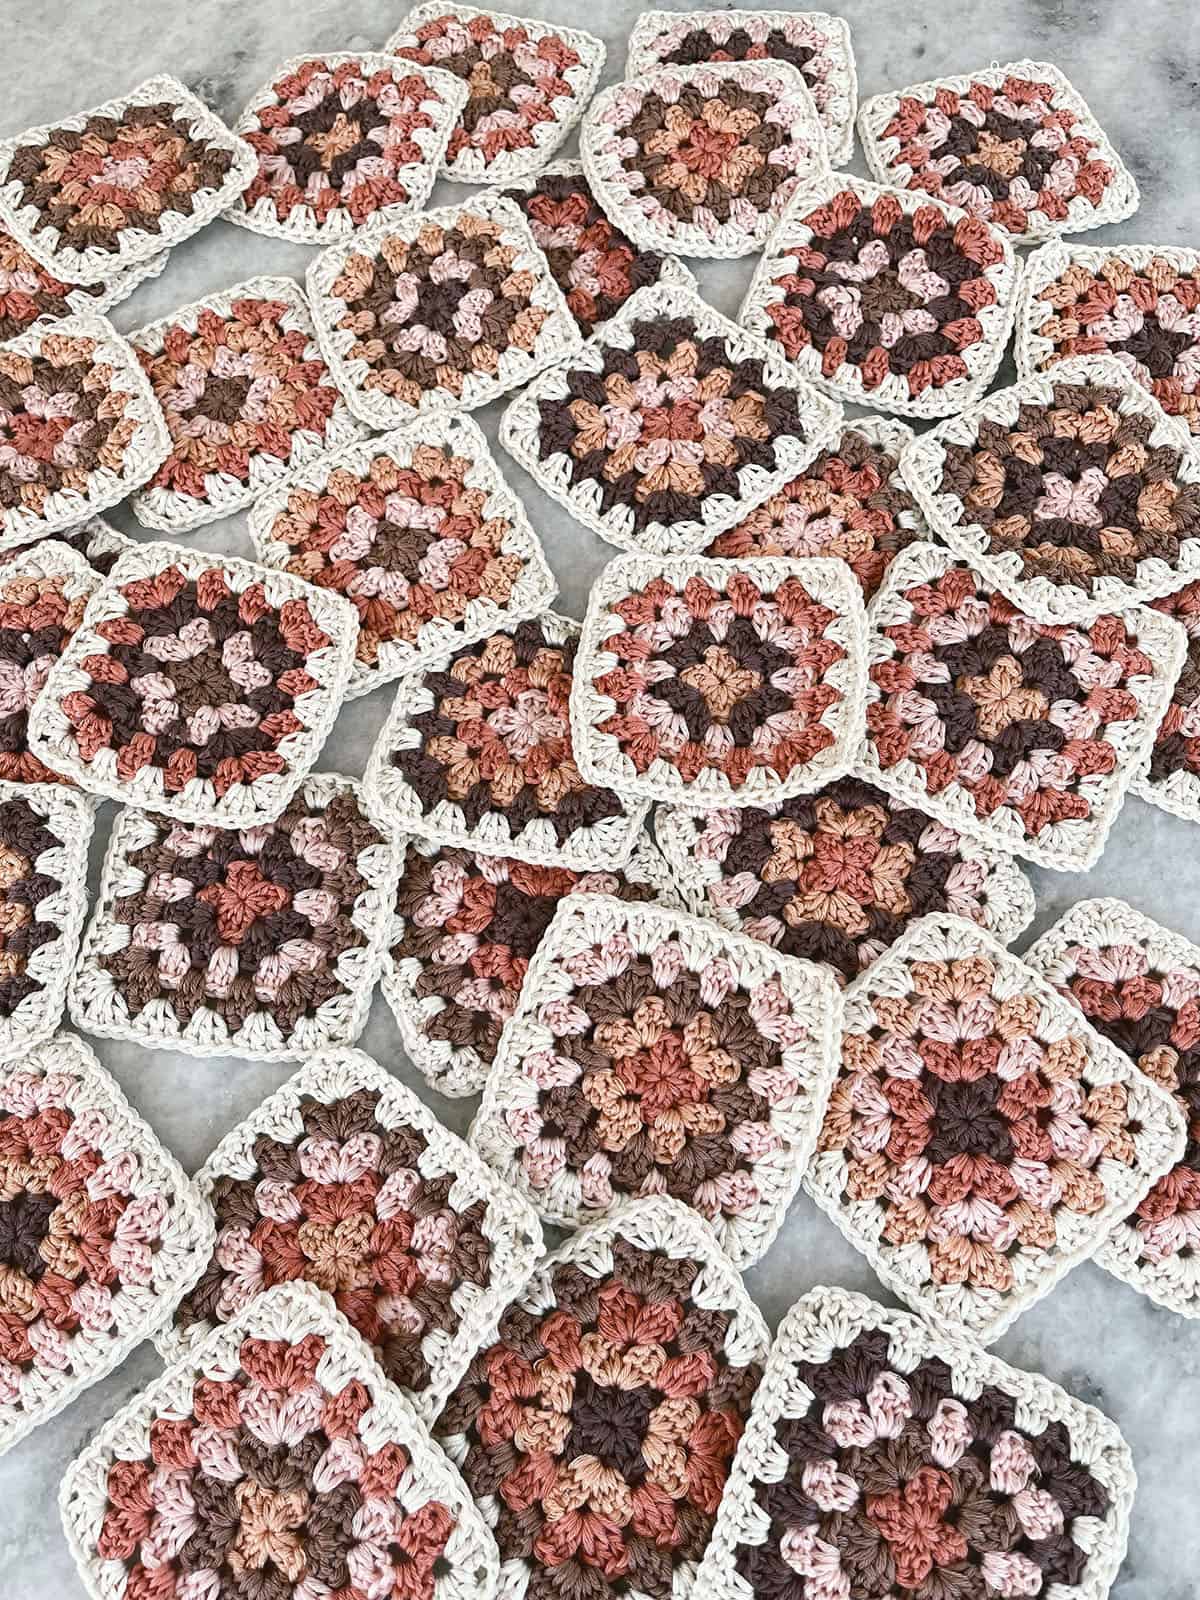
To begin, you will crochet your granny squares. You will create 54, (78, 96, 125) granny squares.
Granny Square Instructions:
This video tutorial will help you construct the granny squares. Scroll down for the written instructions.
Round 1: [ch2, 2DC, ch1, (3DC, c h1) 3x] in MR, with new yarn color, join with a slst in the 2nd ch of the starting ch2, turn.
2: Slst into ch1 gap sp directly below, ch2, 2DC into same ch1 gap sp, [(3DC, ch1, 3DC) in to next gap sp] 3x, (3DC, ch1) into beginning ch1 gap sp once more, with new color yarn, slst in the 2nd ch of the starting ch2 to join, turn.
You should now be able to see your granny square starting to form. Each ch1 sp is a corner of the square where you will increase each round. In each round, you will be working into the gap sp between the 3DC clusters.
3: Slst into ch1 gap sp directly below, ch2, 2DC into same ch1 gap sp, [3DC in next gap sp, (3DC, ch1, 3DC) in corner gap sp] 3x, (3DC, ch1) into beginning ch1 gap sp once more, with new color yarn, slst in the 2nd ch of the starting ch2 to join, turn.
4: Slst into ch1 gap sp directly below, ch2, 2DC into same ch1 gap sp, [3DC in each gap sp to corner, (3DC, ch1, 3DC) in corner gap sp] 3x, (3DC, ch1) into beginning ch1 gap sp once more, with main color yarn, slst in the 2nd ch of the starting ch2 to join, turn.
Note: On the next round, the final round of the granny square, you will work a ch2 at each corner instead of a ch1.
5: Slst into ch1 gap sp directly below, ch2, 2DC into same ch1 gap sp, [3DC in each gap sp to corner, (3DC, ch2, 3DC) in corner gap sp] 3x, (3DC, ch2) into beginning ch1 gap sp once more, slst in the 2nd ch of the starting ch2 to join. Cut yarn leaving a tail to weave in and pull through to secure. Weave in all ends.
Repeat rounds 1-5 to construct granny squares until you have completed 54, (78, 96, 125) squares.
Cardigan Assembly
Granny squares will be joined using a flat slipped stitch join technique. Be sure that you are not working the slipped stitches too tight. If you find that the seams are too tight, you may increase your hook size. For help understanding a flat slipped stitch join, check out this tutorial:
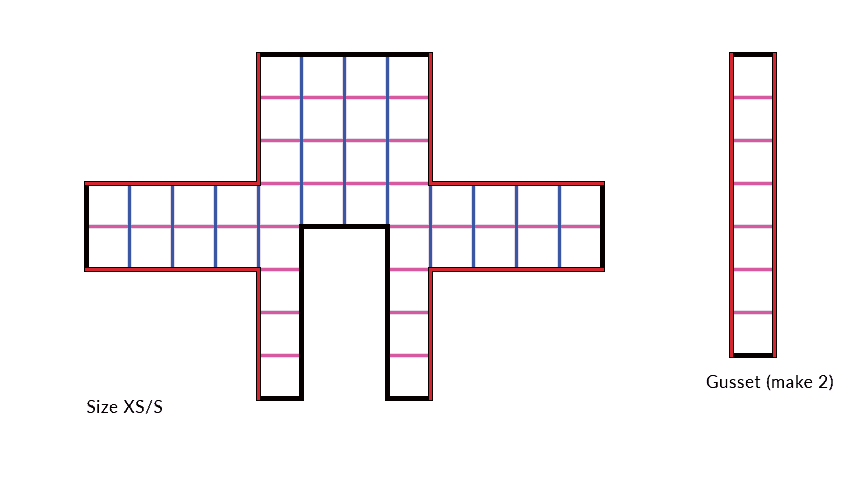
You will begin assembling your cardigan flat by working all vertical seams, and then all horizontal seams. You will also seam together two gussets. Then, you will assemble the body by adding the gusset along the sides.
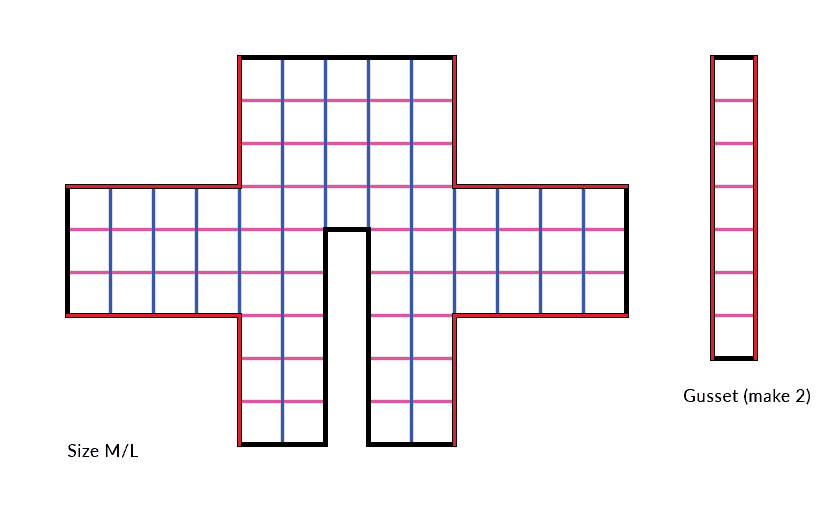
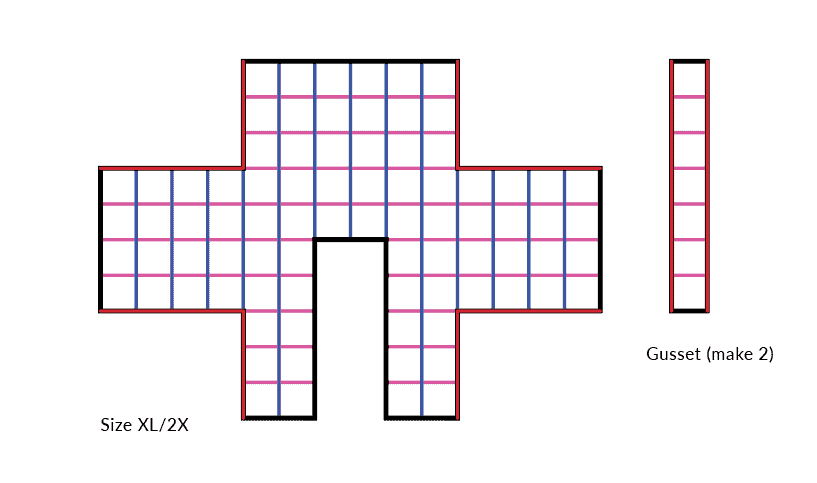
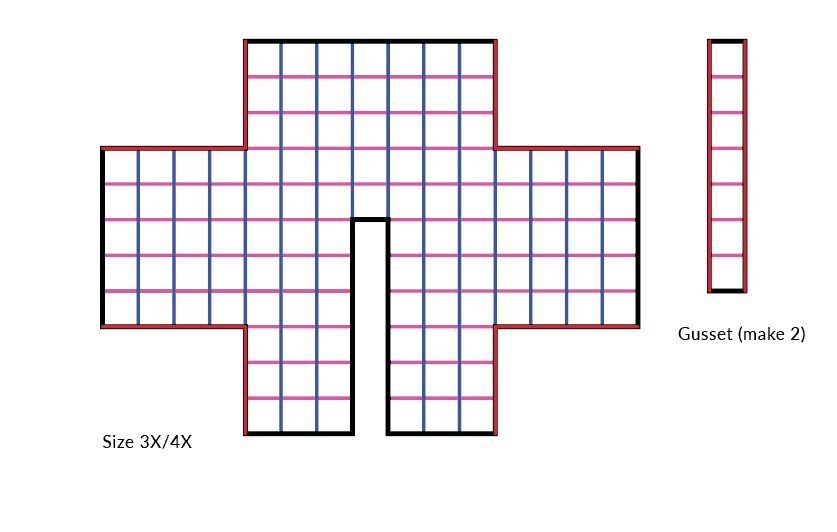
Assemble squares following the diagram below for your chosen size:
1. Using MC, begin by seaming your cardigan by working all vertical seams (seams shown in blue)
2. Work all horizontal seams (shown in pink). Be sure to assemble two gussets.
3. At this point, it is best to block your cardigan while laying flat. Either steam or wet block.
4. Fold the cardigan over and seam a gusset along either side of the body (shown in red)
5. Weave in all ends and begin working border rows
Border:
You will now work a border around the neckline and bottom hem of the cardigan. Border will be worked flat in rows. You will work around the front and neckline first and then turn to work along the bottom edge.
Row 1: Using MC yarn and beginning at bottom corner of cardigan opening, DC into corner gap sp, 3DC into each gap sp until just before the corner at back of neckline, 3DC into the middle of the 3 gap sp at corner, 3DC into each gap sp until the opposite corner, 3DC into the middle of the 3 gap sp at corner, 3DC down opposite side until last gap sp, DC into final gap sp, ch2, turn.
2: DC into 1st gap sp, 3DC into each gap sp up around and down cardigan opening to opposite edge, DC into final gap sp, ch1, turn.
3: in 2nd ch from hook, SC. SC in to both loops of each st around cardigan opening. When you have worked the final st, ch2 and turn the cardigan to begin working across the bottom.
4: DC into the side of the SC just worked for the border, 2DC into both of the DC rows worked along border, DC into both loops of each st across bottom of cardigan to opposite border, 2DC into both of the DC rows at border, DC into the SC at border. Ch2, turn to work back across this row.
5: in 4th ch from hook DC, DC across, ch1, turn.
6: in 3rd ch from hook SC, SC across. Cut yarn leaving a tail to weave in and pull through to secure.
Weave in all ends.
Sleeve Cuffs:
1: Beginning at underside of sleeve, 3DC into the first gap sp, 3DC into each gap sp around sleeve opening, slst with 1st DC to join, ch1.
2: in 3rd ch from hook, SC, SC in to each st around opening, slst to join. Cut yarn leaving a tail to weave in and pull through all sts to secure. Weave in ends.
Repeat for second sleeve.
For questions, please email support@originallylovely.com or comment below!
I’d love to see your finished work! Share on social media using the hashtag #originallylovely or by tagging @originally.lovely on Instagram!
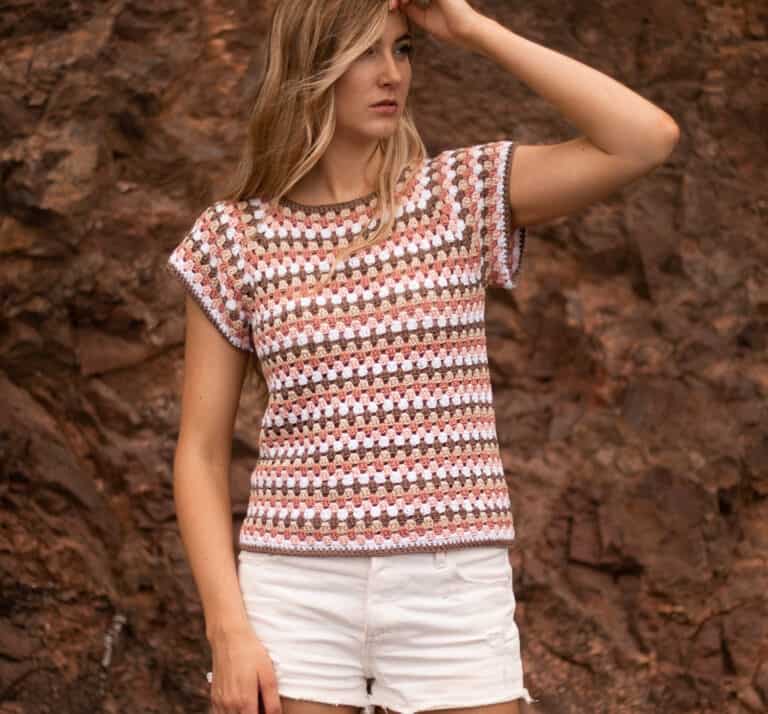
Looking for other easy crochet patterns? Check out the Rosebud Scarf, the Maria Top, or the Cove Crochet Tote Bag!


Hi,
How big is each square?
Lovely pattern!
Anita
Hi! They are 4″ by 4″ 🙂
Hi,
I love your pattern! I am currently working on making the granny squares and I realized on the final round using the main color I only single crocheted once at the corners, instead of the two you did for the final round. I completely forgot. Do you think that will make it hard to seam them all together? Or do you think it might be ok? 😬
This should be fine! The corners might be slightly tighter to work into with your slipped stitch join, but test a couple and see if you like how it looks. The biggest thing is to make sure you don’t make your slipped stitch join too tight, as this will make the cardigan pucker and prevent it from laying flat. If the slipped stitch join isn’t working with the single corner chain, you could also join them together with a whipstitch technique. Hope this helps!
Hi how do you make the gusset? I don’t know how I’ll do that.
Best wishes
Anita
Hi Anita! The gusset is just the strip of 7 granny squares that is used to attach the sides and sleeves together. If you look at the diagram, the gusset is attached to the body pieces shown with the red lines. Nothing extra special to make the gusset, more just the way the squares are seamed together to give a more 3 dimensional fit!
Hi
I really can’t work out where the gusset goes. It has 7 squares but that doesn’t match any of the sides or edges.
🙄
Hi! It does match up with the edges of the arms (4 squares), and the sides of the body (3 squares). It’s basically a piece that connects the sides of the cardigan together. I’ve explained it pretty throughly in some of the other comments, be sure to read through those if you are still confused!!
I’m about a 4x and have been looking all over for a granny square cardi design that would actually fit me! Thank you for making this available to us fat folks! 🙂 <3
I’m so glad you found it!! I always try to be size inclusive 🙂 I am 6′ tall and finding pants is always a struggle so I can relate!
hi,I have all my squares ready. I’m doing the m size. I’m confused by the charts for joining the squares, some have a two square gap, the others one. the photo shows 2 square width across the shoulders. I’m making this for someone else and I’m worried the fit wont be the same as the photo with one square neckline
Hi Naomi!
Crochet has a tendency to curve and pull into the shape that you give it on its own. This is especially the case for granny squares and granny stitch and is part of what makes this stitch so special! For example, if you check out my Maria Top Crochet Pattern you can see that the neckline is curved on its own despite the neckline being worked straight across. This would not work as well with knitting or even some different crochet stitches!
If you look at the chart, the sizes that have a two square gap the opening begins directly in the center of the sleeve when the cardigan is open in the diagram. When the size has a one square gap, the opening begins one square back from the center. This extra allowance gives the squares more time to open and curve to shape the neckline. Part of what makes this pattern unique from some other granny square cardigans is that is it shaped using full sizes squares. There are limitations to this but the border that is chosen, gauge, smaller square size and hook size are all chosen to bridge this gap as much as possible to give the best fit possible using full sized squares. If you are conscious not to seam your squares together too tightly, it will work just fine 🙂
I hope that helps! Let me know if you have any more questions.
Kaitlin
Did you actually use cream instead of white in the sweater?
Hi Diane! Yes, I used Cream. I like the warmer off white look of it!
I’m confused as to where the gussets actually ‘go’. Sure, I see the gussets to the side in red. What I don’t see is where they’re supposed to fit with the rest of the piece.
Hi! Sorry this is throwing you off. So basically, the ‘gussets’ are just the added strips of granny squares that makes the cardigan more three dimensional which gives the closer fit. So the seams that connect the gussets to the rest of the piece are highlighted in red. If you match the red seam along the gusset to the red seam along either side of the cardigan, this is where you sew it together, (basically along the underside of the arm, it then turns at the underarm, and then down the edge of the body). Its best to connect the gusset last because otherwise it can seem a bit confusing! Hope that helps explain it a bit better 🙂
Would you recommend blocking the squares before sewing them together?
It depends! I personally didn’t but that was because my blocked squares and un-blocked squares ended up being the same size. This will probably come down to yarn choice as well. Regardless of what you choose, definitely be careful not to let the seams be too tight!! I was extra cautious to keep my seams loose because of this so that when I did block the seams didn’t hold the sweater too tight or rigid in any areas. Hope that helps!
This is so cute! I want to do the XS/S, but would prefer the body part a little longer. Would I just add one more row of granny squares at the bottom? Do you think I would need to increase the amount of yarn I buy? Thanks for sharing the pattern!
Hi Leslie! Yes adding another row at the bottom would easily make it longer! I would order a little extra yarn to be safe, I don’t think you need extra of every color but maybe just a couple colors!
Hi there. I have just assembled my cardigan and ready to do the border. I’m worried the 3dc in each for the first border row will make too many sts. Am I thinking right or reading it wrong somehow?
Hi Kylie! So this means you’ll be working 3dc (which is one granny st cluster) into each gap sp that is left between the ‘granny clusters’. This will maintain the granny stitch look on the first border row. If you look at the photo of the back of the cardigan, up by the neck, you can see this first border row. Hope that helps 🙂
Hi! I’m really confused about where the gusset goes, I already sewed everything together but have yet to connect the gusset to the rest of the cardigan, I checked the previous comment who asked this but I really don’t get it.
Hi Rai! So the ‘gusset’ is the strip that connects the front and the back of the cardigan together on either side. It gives the 3 dimensional fit. If you match up the red lines from the gusset to the cardigan it will seam together as needed.
I’ll try to explain it differently to help you visualize it a bit better. So imagine the seam on a sweatshirt that goes from the wrist, to the underarm, then down to the waist. Then, imagine you separate this seam and attach a strip of fabric that lines up along this entire seam, on either side of the sweatshirt. So translate that to your cardigan and this is the gusset, it just makes it so that you have a smoother, three dimensional fit! I hope that helps 🙂
Hi Kaitlyn.. I must have a mental block this morning, but for the life of me I cannot figure out the sizing and how you arrived at the bust measurements of 40, 48, etc. if the model has a 33” bust and has a positive ease of 3”, how does that match those numbers? So I am a 38” bust, 5’ tall , would I pick the M/L size and if so, could you explain how that is calculated? Sorry for being so lame.. 😩
Hi Colleen! This cardigan is designed to have 0-6″ of positive ease, rounded to the nearest size, depending on how you like it to fit! So with a 33″ bust, 6 inches of positive ease is 39″, rounded up just slightly would be 40″. With a 38″ bust, you are between sizes so could really go either way, if you want it more snug you could make the 40″ bust. Personally though, I would make the 48″ bust size! Since its made completely using granny squares it is a bit ‘boxy’ and doesn’t have as many size options as a regular cardigan, but I think that’s what makes it so cute and vintage looking! Generally sizes increase by 4″ between sizes but since these granny squares are 4″, the sweater needs to increase by 8″ to allow for an additional square column at both the front and the back as sizes increase. I hope that helps! Let me know if you still have questions!
Lovely tutorials, clear, concise and you have a lilting voice that’s easy to listen to. Love this cardi. Have loved them for years. lu
What a stunning cardigan 🥰 thank you for sharing 🙏🏼
I want to add 1 extra row to make it slightly longer, should I add extra 2 blocks to the gusset as well?
Thank you
Yes, correct! Add one to each gusset as well to make it longer
Hello Kaitlin. I really like this cardigan. It is such a pretty modern granny square cardigan. I have always wanted to make a cardi that is fitted looking and also ends at the waist. Your pattern is the closest I am able find. A shorter sweater looks better proportioned for my body size. My concern is that I am only 5′ and 30 bust. Would i be able to follow this pattern for the XS and is there any way to adjust this pattern using the same directions with smaller crochet hook and a #4 weight yarn. Lionbrand has a new yarn out i would like to try called Skein Tones #4 weight acrylic yarn. I also have an accent colour in the Truboo however it is a #3 weight yarn. Is it wise to double up the Truboo as it is a shiny rayon yarn.
Looking forward to hearing from you. Thank you.
Hi Linda! Yes, it sounds like XS will work perfectly for your size. Also, I think Skein Tones could work, just make a couple squares and try to get them as close to 4″ x 4″ as possible! If your square ends up being too dense or stiff with this yarn I might try and choose another because you’ll want your cardigan to have nice movement to be comfortable! I probably wouldn’t double up on truboo, I think it would be too thick and it won’t have as much ‘stretch’ as Skein Tones will have so it might look a little off. Hope this helps! Let me know if you have any other questions
Hello Kaitlin,
I have assembled all the squares and attached a 7 squares gusset on one side. However, my armhole opening only measures 6″ instead of 8″. Therefore it is too tight and I am not certain how to fix this. Would you have any thoughts on how to fix. where I went wrong? I am using the XS/S pattern and all my granny squares are 4″x4″. I really like your pattern and want to be able to wear it this summer. Thank you for your anticipated feedback. Linda
Hi Linda! I’m thinking that this means you might have seamed them together a bit too tight. Two 4″ squares seamed together for the sleeve would be 8″. In this case, I would recommend going up a hook size for your slipped stitch join to keep it from getting too tight. Another thing I’m thinking is that maybe you didn’t seam the gusset correctly? There should be 3 squares around the arm opening once the gusset is attached properly. If you look at the diagram and line up the red lines on either side, you should have a plenty wide armhole opening. Does this make sense?
Hi Kaitlin,
Thanks so much for your feedback. Yes, I did seam the squares too tightly throughout the whole cardigan. I re-seamed one gusset using a large size hook and it was apparent that the rest of the cardigan was stitched too tight. I will need to undo all the seams and use the larger hook size and re-seam. The thicker yarn weight 4 makes the cardigan stiffer as you had pointed out earlier. I see the difference now compared to truboo/caboo. I may make another cardigan next year with that yarn. I will finish this one for the Fall now:) as it is still a good weight for our hearty winters. Thanks again. Keep the amazing modern patterns coming!
This inspired me! Your design and colors are beautiful. So I tried it using colors of blue, sage, olive and grey with an off-white Main Color. I was followng your YouTube and hadn’t paid too much attention to the size of my squares, so the squares turned out to be 5″ x 5″. I was able to make it work and came out with a S/M cardigan. It turned out quite lovely! I wish there was a way to post a picture. You would be so proud! I thank you so much for the design. I loved it so much, I want to do another! Thank you!
Hi Kaitlin,
I love this granny square cardigan. What would be great is if you would do a video tutorial on putting it together.
Hi Maya! I have been working on a tutorial for assembling a granny square cardigan very similar to this, so stay tuned! The best way to be notified when I post the tutorial is by signing up to my email list!
Hope that helps
-Kaitlin
Just clarifying that I’ll need 97 granny squares to complete an XL – 2 XL
sweater?
Hi Michelle! Yes, that is correct 🙂
How would I reduce this in order to have it fit my 4 year old granddaughter? I absolutely LOVE this pattern and would love to make it small enough for her. Would I make the same number of squares as per the smallest only make each square say 3″ by 3″ or something? Or would I make the squares the same size and reduce the numbers required and change the layout. I had an attempt at reducing the number and got in a complete muddle! Any help/pointers would be so gratefully received. Many thanks.
Hi Debbie! I wouldn’t try to make it with fewer squares, it has a pretty unique construction so that would be tough to do. Working smaller squares could work but will take a bit of trial and error. For example, 3″ squares with size XS would make a cardigan that is 15″ wide. I don’t know kids sizing well but that sounds like it may be too big. To calculate width just take your square size times 5 for the smallest size. If you look at the diagram, size XS/S is 5 squares wide (4 squares wide, then an additional square to account for the gusset). Does that help at all?
Is there a tutorial for the border… I am a little confused about that .
Hi! I don’t have a tutorial about the border. What is it specifically that is confusing you? Happy to help!
My neck is a little wide and the cardigan keeps falling off my shoulders … any suggestions on how to fix that.
For the border is it the granny cluster stitch …
Hi! The border should help fix this. Yes, the border is basically two rows of granny stitch and then a couple rows of double crochet at the bottom and single crochets around the neck opening (very general description, be sure to read the border instructions)!! Another thing you could try to do to help is block the cardigan by soaking it in lukewarm water and lay the piece flat to dry if you haven’t already! This generally relaxes it and helps it to lay more naturally.
I have question on the border as well. To begin with the border, how do i DC into corner gap sp? Do i need to tie a knot of my yarn to the corner gap before i do the DC into that corner gap?
Hi Janet! Thanks for reaching out. You can just insert your hook into that corner and pull up a loop. Then go right into the DC and just weave in that end later. Does this help? Let us know if you have any additional questions!
Hi Caitlin. I love this cardigan and now have my squares done. In the video on how to join them, each square only has 1 chain in the corners, but this pattern has 2. Which chain should I slip stitch into to join them? Is it the first chain you come to for whichever direction you’re joining in? Thank you. Sarah x
Hi! Yes, you’ll chain into the first slip stitch you work to. The two chain stitches in the corners are there so that each side has its own chain to slip stitch into. On one side, you’ll work into the chain stitch closest to that side. When you come back and work the other side, you’ll be working into the chain stitch closest to that side as well, so each has its own. Does that make sense?
Hi Kaitlin. Yes, I think I understand. Thank you so much for this fantastic pattern. Making it for my Niece who is in love with it too! Xxx
Hi Kaitlin.
Thank you so much for your reply. I think I have understood correctly. I’m just wondering if I can make a m/l cardigan but cropped. If I leave 2 squares off the length, I think it might ride up too much. Is there a way I can have 8 squares in the length and possibly the 3 square sleeve (+ gusset?) Or could I make a gusset that is 2 squares wide and could that make the sleeve more roomy without ruining the shape of this beautiful piece? I’ve never done a granny square piece of clothing before and i’m not sure is either of these things would work. Thank you so much for the fantastic pattern x
Hi Sarah! It’s actually a bit cropped to begin with! The M/L size will be about 20″ long, with only 3 squares in length after the underarm. I wouldn’t leave 2 squares off length, you could maybe try 1 off length if you find it too long. Modifying the gusset will make it much wider and at that point you would be better off going up a size. I think best bet would just be to seam it without weaving in your ends all the way and then going back in and taking off some squares for length if you needed at that point! Hope that helps 🙂
Hi! I’m having a tough time getting a 4×4 inch granny square using 5 colors. Mine turned out to be 5×5 inches. I’m a size xs/s and am concerned that the cardigan will be too big if I use 5×5 squares. Should I eliminate 1 round/color on each square or eliminate a complete column from the back? I am using 3.5 oz worsted acrylic yarn with a 4 hook. Thanks for your help. This is an adorable sweater and I am so excited to start!
Hi! Yes, your sweater would likely be too big if you move forward with the 5×5 squares. A couple things you could do…. You could try and use a smaller hook size to get closer to gauge … but I’m thinking this will make them too dense. I would try using 4 colors instead of 5 and see if that gets you closer to 4″. I wouldn’t remove a column from the back because this will throw off the fit quite a bit. If that still doesn’t work it might come down to yarn choice! I do find that some worsted weight acrylics can be quite a bit heavier than others, its a bit of an inconsistent size. I hope that helps! Let me know if you have any more questions 🙂
hi, I cannot find the yarn you used which would be a good alternative please?
Hi Carole! I have lots of yarn options linked in the post under the heading ‘Yarn Substitutions’ – if you scroll up you should be able to find it 🙂
Hope that helps! – Kaitlin
Thank you for this very detailed pattern and all the videos and images. Came here specifically to ask about substitutions because of course Lion has discontinued another product. (!) Thank you for your info regarding substitutions also! 🙂 P.S. Coboo is mentioned as a sub, but it’s listed as a 3 weight, where Nuboo was 4. Have youused the Coboo for this?
Hi! Thanks so much, I’m glad you like the pattern!
This is a great question. Personally, I think Nuboo was more of a 3 weight yarn, Coboo is super similar weight to Nuboo and makes a great sub, I’ve seen quite a few people use this as an option!
Hope that helps, let me know if you have any other questions!
I love the look of this pattern. Possible to lengthen the sleeves?
Modifying a pattern is a bit tough because it hasn’t been tested or edited with modifications! So it’s hard to say for certain. As a policy we don’t offer help modifying patterns, since we can’t assure accuracy and quality! You could certainly try adding a few more squares to see if you like the length and the look with the additional length!
Sorry we can’t be of more help. Let us know if you have any additional questions.
I’m having a very hard time with the flat slip stitch with the coboo yarn I used. It looks very messy and the splitty yarn is giving me trouble. Is there another type of stitch that will work to join the squares?
Hi Kelly! Yes! You could try a whipped stitch join! It won’t have the exact same look as the slip stitch but will be much less of a headache. Here is a good tutorial: https://undergroundcrafter.com/2015/08/25/crochet-tipstuesday-how-to-join-granny-squares-using-the-whipstitch/
Please let us know if you have any other questions! (:
I have a question about the border. Are rows 1, 2, & 3 of the pattern for the sides of the front and around the neck? then remaining rows 4, 5, 6 are just for across the bottom? Or do I do all six rows up one side, around the neck, down the other side and then across the bottom to meet up with where I started. Thanks.
Hi Kristin! Correct, border rows 1-3 are worked around the sides/neck of the cardigan rows 4-6 are worked across the bottom of the cardigan. Just pay extra attention to how to turn the cardigan border rows because its all worked in one piece. Let us know if you have any other questions (:
Hi Kristin
I have got to the stage of attaching the gussets I’m doing the M/L size so I have 3 granny squares going down the sleeves but when I add the gussets I will have 4 this will make the sleeve very wide any advice please
Hi! Yes the sleeve for size M/L will be 4 squares in circumference. Its definitely a bit chunky but that is part of what gives granny squares that cute, vintage look. It does drape nicely when completed if that helps reassure you!
Hi, I love this pattern! I’m not sure what happened, but I followed the pattern exactly but ended up with 5×5 squares. The friend I made it for was a perfect fit for the medium but the sleeves were super long. I took off one square but it was still loo long, however she loves it oversized. I want to make it for my daughter and she tried it on and the medium was a good fit but needed a another square removed from the sleeve. I want to adjust somehow. Should I use a smaller hook or size 3 yarn or….
Hi Sharon!How sweet of you to make one for your friend! So glad to hear she loved it. For your next one yes, a smaller hook size or thinner yarn. To get the proper fit, you want to aim for your squares to be 4×4″ Hope that helps!
This sweater is beautiful! I love rhat you’re responding to questions after all this time!
I’ve nearly finished the sweater, but I’m very confused about the border. :/ Am I supposed to 3DC in each granny square gap space, and then DC once in each chain between them?
Hi! In these squares within the pattern, there isnt a ch1 between the granny stitch clusters. So no, to maintain the look on the border, I wouldn’t work a DC into that ch st, but just work the 3DCs into each gap sp. Hope that helps!